
Cloud bills for Google Kubernetes Engine (GKE) often grow out of control. You pay for unused server space and poorly configured settings every minute of the day. Your technical team spends hours manually adjusting servers instead of building product features, yet the monthly invoice remains high.
You can reduce these expenses systematically. And the simple fix is to automate your infrastructure to match your exact business demand.
In this blog, we have explained how GKE pricing works, the exact settings you need to change, and how to automate your server management as part of a broader Google cloud cost management strategy using modern GCP cost optimization tools. You will learn the exact steps to apply GKE cost optimization.
Key Takeaways: Consolidate and Upgrade: Combine isolated testing environments to avoid duplicate $73 monthly management fees, and switch to E2 machine types to immediately reduce compute costs.
Rightsize Workloads: Always define Pod Requests and Limits using historical data to stop over-provisioning and prevent unexpected "Best Effort" software crashes.
Aggressive Scale-Downs: Activate the "optimize-utilization" autoscaler profile to tightly pack applications and shut down empty servers much faster.
Fix Autoscaler Conflicts: Never mix the Horizontal (HPA) and Vertical (VPA) autoscalers on the exact same metric; use the Multidimensional Pod Autoscaler to keep systems stable.
Smart Infrastructure Routing: Move flexible background tasks to deeply discounted Spot VMs, and deploy low-priority "Pause Pods" to guarantee instant server availability during traffic spikes.
Automate Execution: Stop relying on manual work and use an AI platform like Costimizer to continuously find idle resources, adjust limits, and execute savings.
CFOs often see a massive Google Cloud invoice and cannot figure out what they actually bought. To stop the financial leak, you need to know how Google charges for its container services.
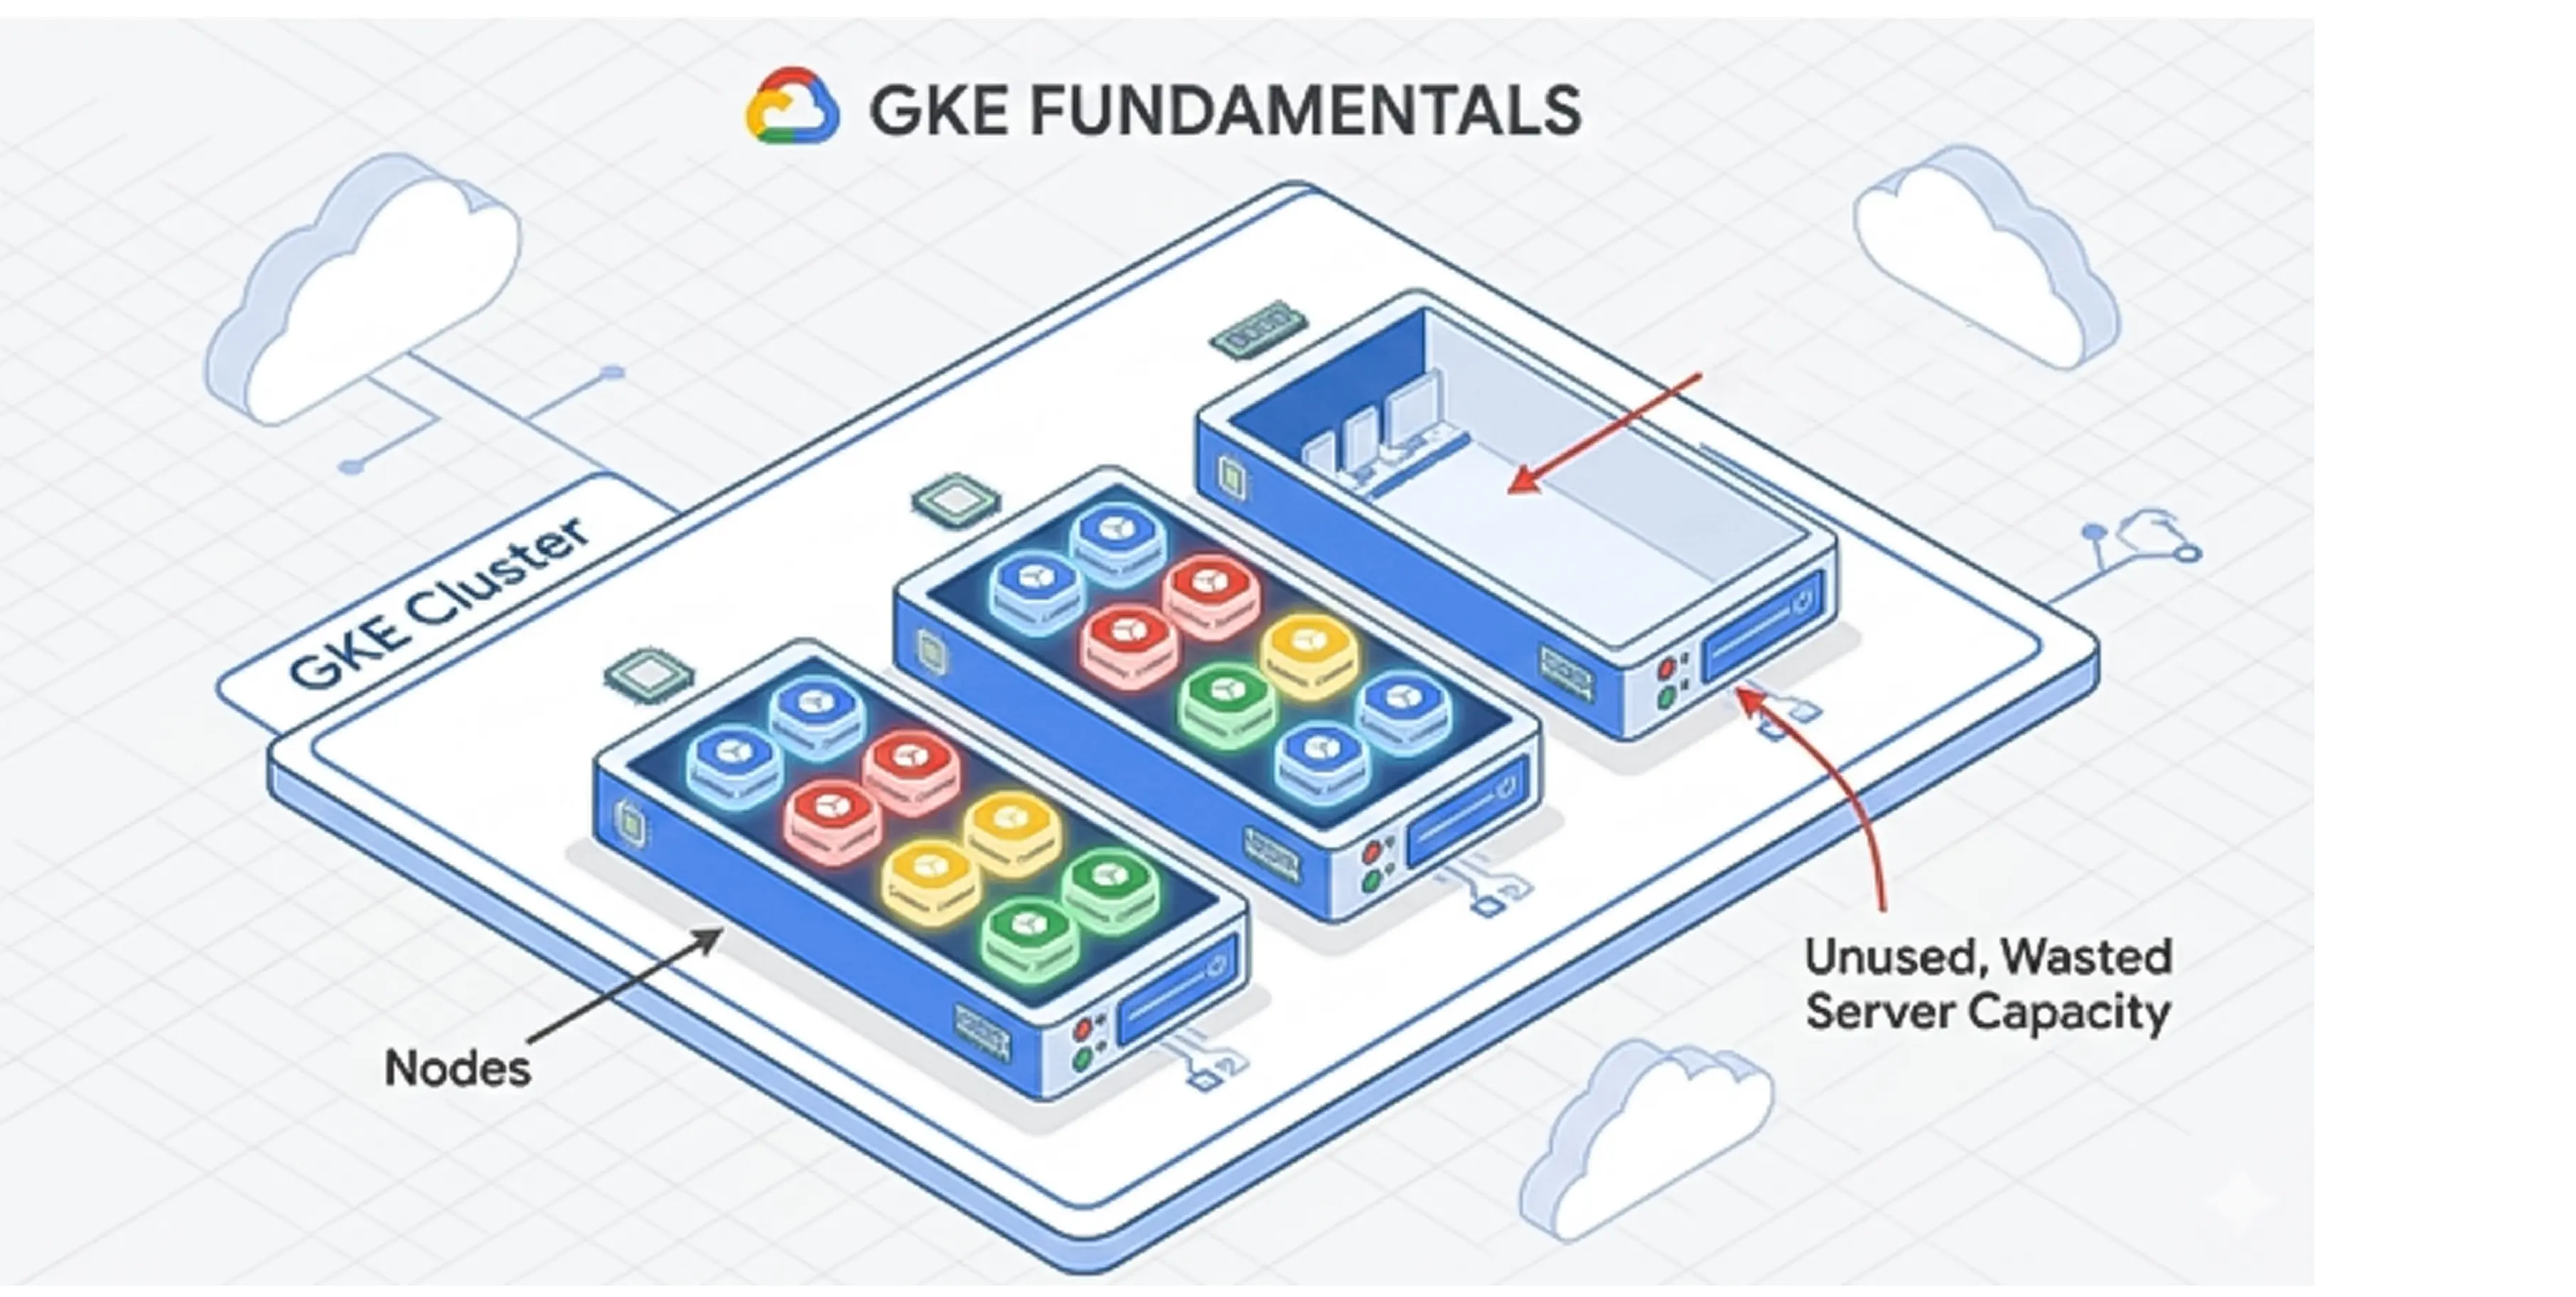
Google Kubernetes Engine (GKE) is a management system that runs your company's software applications. Think of it like a smart building manager. Instead of renting one massive server and hoping it is enough, GKE groups your software into small units called "Pods" and packs them onto individual servers called "Nodes."
GKE operates on a pay-as-you-go model. You do not pay a flat monthly rate. Instead, your bill fluctuates based on three main items:
If you leave a server running overnight with zero customers using it, Google still charges you full price for the compute time.
Google offers three ways to run your GKE environment. Each mode bills you differently.
In GKE Standard Edition, you rent the actual nodes (the computers). You pay for the total capacity of those nodes. If you rent a computer with 16 processors but your applications only use 2 processors, you still pay for all 16.
In GKE Autopilot, Google manages the nodes for you. You do not pay for empty server space. You only pay for the exact amount of computer power your specific applications request.
Which mode is cheaper? Google’s own analysis shows Autopilot can be 12-40% cheaper than Standard for the same workloads. The reason is straightforward: Standard charges you for the full node regardless of how much your pods actually use, while Autopilot charges only for requested pod resources. The wider your idle gap, the greater the Autopilot advantage.
GKE Enterprise Edition includes advanced management features for companies running multiple application environments across different locations. It carries an additional cost per processor.
Every cluster you create in GKE comes with a flat management fee of $0.10 per hour, which equals roughly $73 per month per cluster. This fee pays for the control plane, the central brain that keeps your applications running.
Google provides a free tier that waives this fee for one cluster per billing account every month. Many companies accidentally create multiple small testing clusters, triggering $73 charges for each one.
A better financial practice is to use a single large cluster and separate your teams using virtual walls called Namespaces.
Here is an example: Let's say you are a mid-sized retail company that noticed a $1,500 monthly charge just for cluster management. You realized your developers had spun up 20 separate testing clusters. By consolidating these into one shared development cluster using Namespaces, you can eliminate 19 management fees instantly.
Before diving into optimisation tactics, you need to know where your budget actually goes. Most GKE bills break down across five categories in roughly the same proportions:
Cost Category | Typical Share of Total Bill |
Compute Nodes (CPU + RAM) | 60-70% |
Data Transfer (Egress) | 10-15% |
Storage (Persistent Volumes, Images) | 8-10% |
Load Balancers | 5-8% |
Control Plane Fees | 1-2% |
This means rightsizing your worker nodes has 10x the financial impact of consolidating cluster management fees. Start your optimisation effort where the money actually is: compute.
When analyzing cloud costs, specific indicators tell you exactly where money is wasted. Google refers to these as the Golden Signals of cost optimization.
The most common reason for high cloud bills is over-provisioning. Developers ask for more resources than the application actually needs.
The problem is fear. Engineers do not want the application to crash, so they request maximum capacity. The plan to fix this is Workload Rightsizing.
This means matching the requested resources to the actual historical usage of the application. According to industry data, 40% of over-provisioned workloads have their requests set equal to their maximum limits, which wastes massive amounts of money.
When configuring a Pod, developers can set a Request (the minimum guaranteed resources) and a Limit (the maximum allowed resources).
If a developer fails to set these numbers, Kubernetes assigns the Pod a Quality of Service (QoS) class called "Best Effort." If they set a Request but no Limit, it is classified as "Burstable."
This creates a serious business risk. When a Node runs out of memory, the system must delete applications to keep the Node running. The system always kills "Best Effort" Pods first. If your customer checkout application is marked "Best Effort," it will crash during a busy sales day.
Engineers often react to these crashes by buying larger, more expensive servers. The correct fix is to assign proper Requests and Limits so the application is guaranteed the resources it needs.
Google provides a built-in dashboard to help you find wasted resources. It is called the Cost Optimization Insights dashboard.
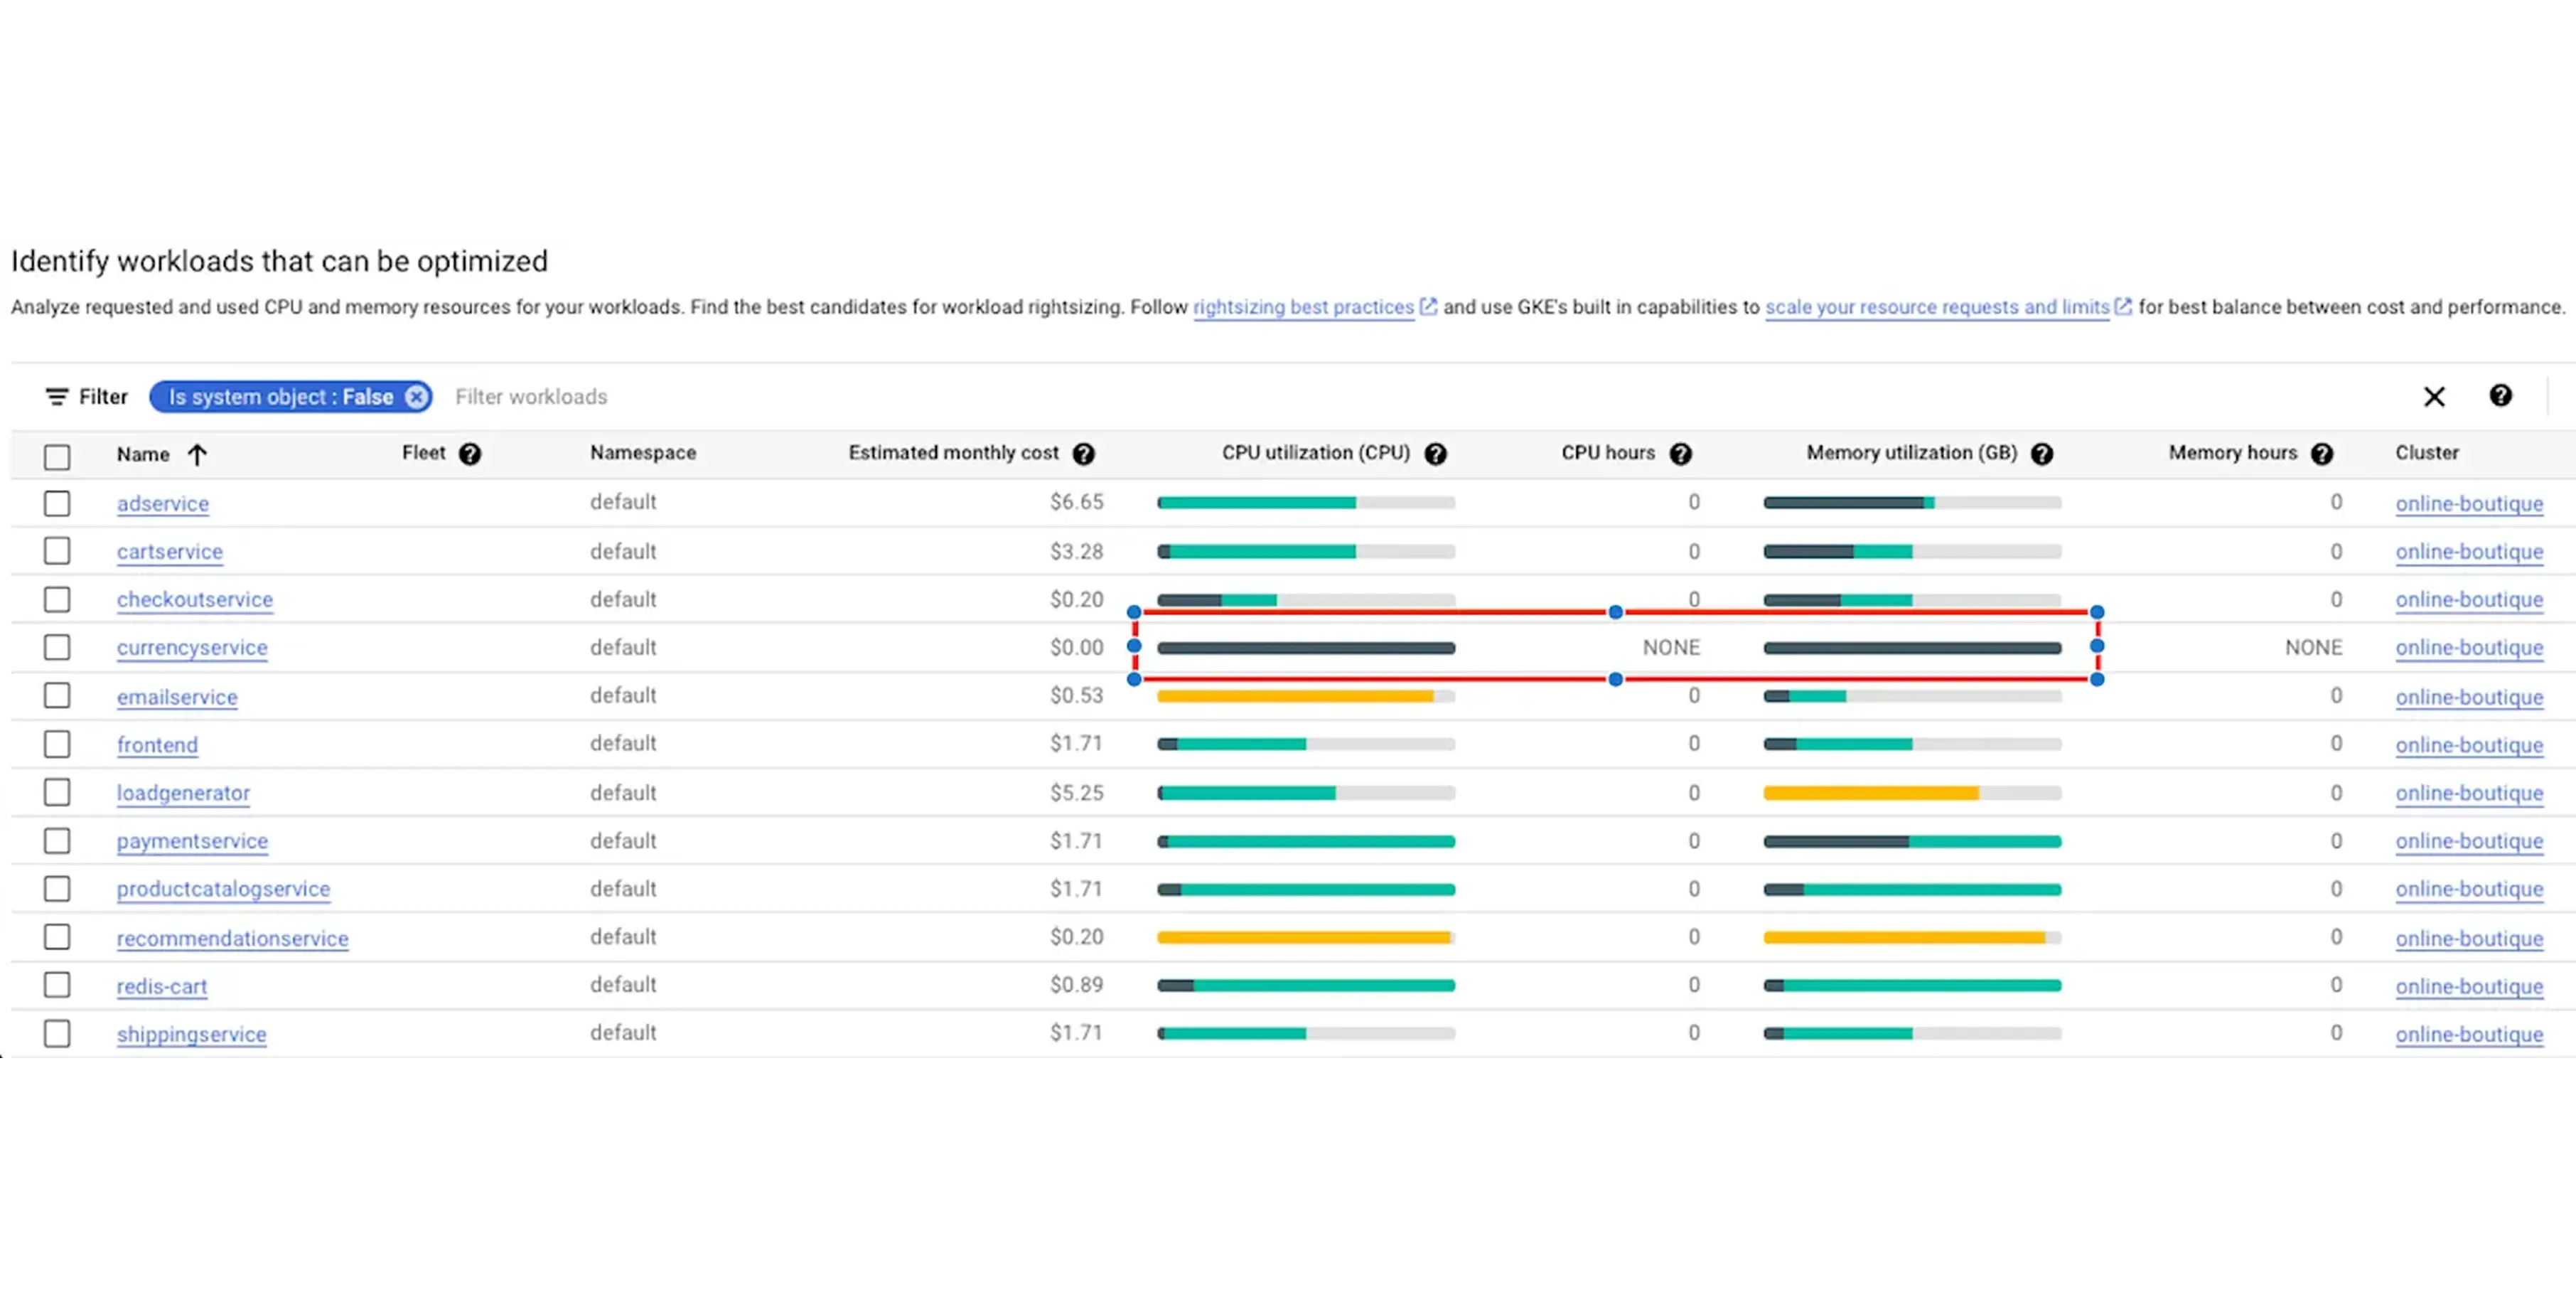
The problem for business owners is that engineers often say they cannot find the waste. You can direct them to this exact tool. In the Google Cloud Console, the dashboard uses a simple color-coding system:
If you see a tiny sliver of dark green surrounded by massive amounts of light green, you are paying for empty space. Your engineers can fix this immediately. They navigate through the console: Workloads > Actions > Scale > Scale Compute Resources.
This applies the recommended right-sizing limits instantly.
Some cost reductions require weeks of engineering work. Others take a few minutes. Start with these simple adjustments to see immediate drops in your bill.
By default, the Cluster Autoscaler operates conservatively. It leaves underused physical servers running for over 10 minutes before turning them off. You can change this behavior by activating the "optimize-utilization" profile.
This setting instructs the system to aggressively pack your applications onto fewer physical servers. It constantly looks for opportunities to move smaller workloads together. Once it empties a server, it shuts it down immediately, stopping the billing clock much faster.
Google offers different families of computers. The N1 machine type is an older general-purpose option. The E2 machine type is a newer, cost-effective alternative.
E2 machines share their processors efficiently behind the scenes. They cost up to 31% less than N1 machines while providing the exact same performance for standard web applications and small databases. Switching your standard workloads from N1 to E2 instances yields immediate monthly savings without requiring code changes.
Standard machine types force you into fixed CPU and RAM combinations. If your application needs exactly 6 vCPUs and 20 GB of RAM, the nearest standard option forces you to buy 8 vCPUs and 32 GB, and you pay for every bit of that headroom whether you use it or not.
GCP Custom Machine Types let you provision exactly the CPU and memory your workload requires. You specify the exact vCPU count and RAM in increments, pay only for what you define, and eliminate the silent overspend that standard sizes impose. This is a GCP-specific cost lever not available on AWS or Azure, and for teams with well-profiled workloads, it is one of the fastest ways to shrink the compute portion of the bill without touching your application code.
Internal Google data shows that up to one in ten clusters across the GKE fleet sit completely idle at any given time. Companies frequently create temporary environments for testing new software and simply forget to turn them off.
You can use a tool called GKE Usage Metering combined with your billing dashboard to track actual network traffic. If a cluster shows zero external traffic and minimal processor usage for seven days, it is a zombie resource. Deleting these forgotten testing environments immediately stops the resource drain.
Once you fix the obvious waste, you must look at how your applications consume resources internally.
Every application in GKE uses two key settings:
requests and limits. A "request" is the guaranteed amount of computer power the application receives.
A "limit" is the absolute maximum it can consume. Proper tuning requires monitoring actual usage over two weeks and setting the request slightly above the average peak.
If your engineers fail to set these requests, Kubernetes assigns the application a Quality of Service (QoS) class. This classification determines which applications survive when a server runs out of power.
QoS Class | How It Is Assigned | What Happens Under Server Pressure |
Guaranteed | Requests equal Limits | Safest. Never killed unless it exceeds its own limit. |
Burstable | Requests are lower than Limits | Killed only if no Best Effort applications are left. |
Best Effort | No Requests or Limits set | First to be killed. Causes unexpected software crashes. |
When applications crash due to the "Best Effort" class, engineers often over-provision the entire server to stop the errors. Setting requests properly secures a "Guaranteed" or "Burstable" class, keeping the software stable without forcing you to buy excess hardware.
GKE uses three different automatic scaling tools. They work together in a specific order.
The Horizontal Pod Autoscaler (HPA) changes the quantity of your applications, which plays a major role in effective eks cost optimization. If traffic spikes, HPA creates five identical copies of your software to handle the load.
The Vertical Pod Autoscaler (VPA) changes the size of your application. It gives an existing application more memory or processor power.
The Cluster Autoscaler (CA) changes the physical hardware. When HPA creates new copies, CA turns on new physical servers to hold them.
A common configuration mistake causes massive billing spikes. Engineers turn on both HPA and VPA for the exact same metric, such as CPU usage.
When CPU usage rises, HPA tries to create new copies of the application. At the exact same time, VPA tries to increase the size of the existing application. They fight each other. This causes the system to behave erratically and provision far too many resources.
The solution is the Multidimensional Pod Autoscaler (MPA). MPA handles both safely by scaling the quantity of applications based on CPU, and the size of the applications based on Memory.
Your application code sits inside a file called a container image. Large images take a long time to download and start.
If your image size is 2 Gigabytes, the system might take several minutes to turn on a new copy during a traffic spike. To survive this delay, engineers leave extra copies running permanently.
You can fix this by trimming the image size to 200 Megabytes or by enabling GKE Image Streaming.
Image Streaming allows the application to start in seconds by pulling only the necessary data to boot, rather than waiting for the entire file. This allows you to safely run fewer copies during quiet periods.
These strategies require engineering planning. They yield the highest financial returns for large-scale operations.
Google offers steep discounts on spare computer capacity. Spot VMs and Preemptible VMs cost up to 91% less than standard servers.
The risk is that Google can shut down these servers at any moment if a paying customer needs them. Preemptible VMs always shut down after exactly 24 hours. GCP Spot VMs can run longer but still face random termination.
You should only use these cheap servers for background tasks, like data processing, that can safely restart if interrupted. Engineers apply technical rules called "taints and tolerations" to these servers.
These rules act like strict filters, ensuring your customer-facing web software never lands on these risky computers.
Standard GKE setups require humans to guess what size servers they will need in the future. Node Auto-Provisioning (NAP) removes this guesswork.
NAP watches your applications waiting in line to be deployed. If an application needs a specific combination of memory and processing power, NAP automatically creates a custom server group tailored perfectly to that application.
It prevents you from forcing small applications onto massive, expensive servers just because that was the only hardware available.
When a sudden flood of users hits your website, GKE needs to turn on new physical servers. This takes time, causing slow loading times for your users.
You can bypass this delay using a "Pause Pod." A pause pod is an empty, low-priority task that occupies space on your server. When a high-priority customer application needs to start immediately, the system kicks out the pause pod and takes its place.
The customer experiences zero delay. The system then turns on a new physical server in the background to hold a new pause pod.
Sometimes your Cluster Autoscaler refuses to shut down an empty server. This happens because of a strict rule in the system.
Certain Google system tools, like kube-dns or metrics-server, are not allowed to be interrupted. If one of these small tools sits on an otherwise empty server, the autoscaler cannot shut the server down. You end up paying for a large computer just to run a tiny background tool.
The solution is to configure a Pod Disruption Budget (PDB) or apply a specific annotation (cluster-autoscaler.kubernetes.io/safe-to-evict: "true"). This gives the system permission to move the tool and successfully shut down the expensive server during quiet hours.
When the system tries to remove a server to save money, it sends a warning signal called SIGTERM to your applications.
If your software ignores this signal, it drops active customer connections. Customers experience 5xx errors on their screens. To prevent these errors, engineers will often turn off the autoscaler entirely, leaving the business paying for maximum capacity 24/7.
Your developers must add instructions called preStop hooks to the application code. This tells the software to finish processing current users before shutting down, allowing you to safely automate your cost savings without impacting the user experience.
Moving data out of Google Cloud, or moving data between different geographic regions, incurs high network data transfer fees.
You can lower these fees with clever networking architecture. Using a tool called NodeLocal DNSCache stops your applications from constantly sending external network queries just to resolve web addresses. Utilizing Multi-Cluster Ingress and Network Endpoint Groups (NEGs) ensures that user traffic routes directly to the closest, cheapest data center without bouncing around your internal network first.
The final layer of optimization happens outside the technical architecture. It happens in procurement and tracking.
Google offers financial rewards for loyalty. Sustained Use Discounts (SUDs) happen automatically. If you leave a server running for more than 25% of the month, Google automatically drops the price for the remainder of the month.
Committed Use Discounts (CUDs) require a contract. You sign a 1-year or 3-year agreement promising to spend a specific amount of money or use a specific amount of hardware. In exchange, you receive massive price cuts. You should only buy CUDs for your absolute minimum baseline usage, never for your peak usage.
The exact savings depend on the commitment type. A 1-year spend-based CUD saves you 28% off standard rates, while a 3-year spend-based CUD saves 46%. If you commit to specific resource types, savings climb further: resource-based CUDs deliver up to 55-70% off on memory-optimised machine families.
To understand how these discounts stack across your workloads, see our guide on committed use discounts.
You cannot optimize what you cannot see, this principle is explained in detail in our GCP cost management guide. Start by using the GCP Pricing Calculator before writing any code. This sets a baseline expectation for the budget.
Next, apply digital labels to every resource. Labels act like name tags. They allow you to sort your monthly bill by department, project, or specific team. Finally, use the Cloud Operations suite to monitor real-time spending trends and catch expensive errors before the monthly invoice arrives.
Every strategy in this blog works.
The challenge is execution at scale.
Setting pod requests manually across hundreds of workloads, monitoring autoscaler behaviour, identifying the right time to commit to CUDs, and tracking which clusters are genuinely idle are individually manageable tasks. Together, across a real engineering organisation, they consume engineering hours that could go toward building a product.
Costimizer is one of the best AI cloud cost optimization tools available for Google Cloud.
It is built specifically to automate this work. It continuously analyses your GKE clusters: identifying over-provisioned pods, flagging idle clusters, surfacing CUD purchase opportunities after rightsizing rather than before, and providing per-team cost attribution without requiring engineers to manually tag every resource.
Where most best GKE cost optimization tools stop at reporting and leave the implementation to your team, Costimizer closes the loop, connecting the recommendation directly to the action. Engineering teams that have used it report meaningful reductions in both cloud spend and the engineering time previously spent on manual cost reviews.
You must implement a chargeback model. You apply billing labels directly to Kubernetes namespaces. You assign a specific namespace to each engineering team. You then use Google Cloud Billing to track the exact CPU and memory cost consumed by that specific namespace. This makes each team strictly accountable for its spending.
No. Costimizer connects using a strict read-only role by default. The system analyzes your billing data and cluster metrics without the ability to modify your underlying infrastructure. You retain complete security control.
Kubernetes uses Persistent Volumes for storage. Developers often request massive storage disks to prevent system crashes. Google charges you for the total disk capacity you request, not the actual data you store. You must review your Persistent Volume Claims and shrink disks that remain mostly empty.
The initial setup takes less than 15 minutes. Once you link your Google Cloud account, our agent scans your usage history. You receive a complete list of financial waste and exact sizing recommendations within 24 hours.
If your private GKE servers talk to the public internet, they route data through Cloud NAT. Google charges a data processing fee for every gigabyte that passes through this gateway. You can reduce this fee by routing traffic within the Google internal network using Private Service Connect.
Only if you grant it permission. You can use the platform in a manual mode, where it simply sends alerts. Once you build trust in the recommendations, you can allow the agent to execute specific, low-risk changes automatically.
You lose actual revenue. If new servers fail to boot fast enough, your applications crash. Users abandon your website and go to competitors. This is a direct financial loss. You prevent this by using overprovisioning to ensure spare capacity is always available before traffic arrives.
Costimizer offers a free tier for basic visibility. For advanced automation, we charge a flat software fee based on your total cloud spend. You keep all the money you recover.
•
CTO•
Articles