You know your cloud bill is too high. You also know that asking your engineering team to randomly cut server resources will make your applications crash.
This is the reality for most CFOs running Kubernetes. You pay for computing power you never use because your team over-provisions resources as a safety net against downtime.
Kubernetes pod rightsizing solves this specific problem. It is the practice of matching your cloud infrastructure exactly to your application's actual needs.
In this article, you will learn how to reduce your cloud waste, avoid application-killing memory errors, and automate your resource management safely using modern tools.
Kubernetes pod rightsizing is the ongoing process of adjusting the exact amount of CPU and memory allocated to your software containers.
When you run an application in the cloud, you must tell the system how much computing power it requires. If you assume wrong, you either overpay the cloud provider or your software stops working. Rightsizing saves you from relying on your gut.
A natural tension exists in modern technology companies. The CFO reviews the monthly AWS, Azure, or GCP bill and demands fewer compute instances and lower node hours, making Kubernetes chargeback vs showback strategies increasingly important for FinOps accountability.
On the other side, Site Reliability Engineers (SREs) are evaluated on uptime. Their job is to prevent application downtime. For an SRE, the easiest way to prevent a server crash during a traffic spike is to request double or triple the necessary CPU and memory.
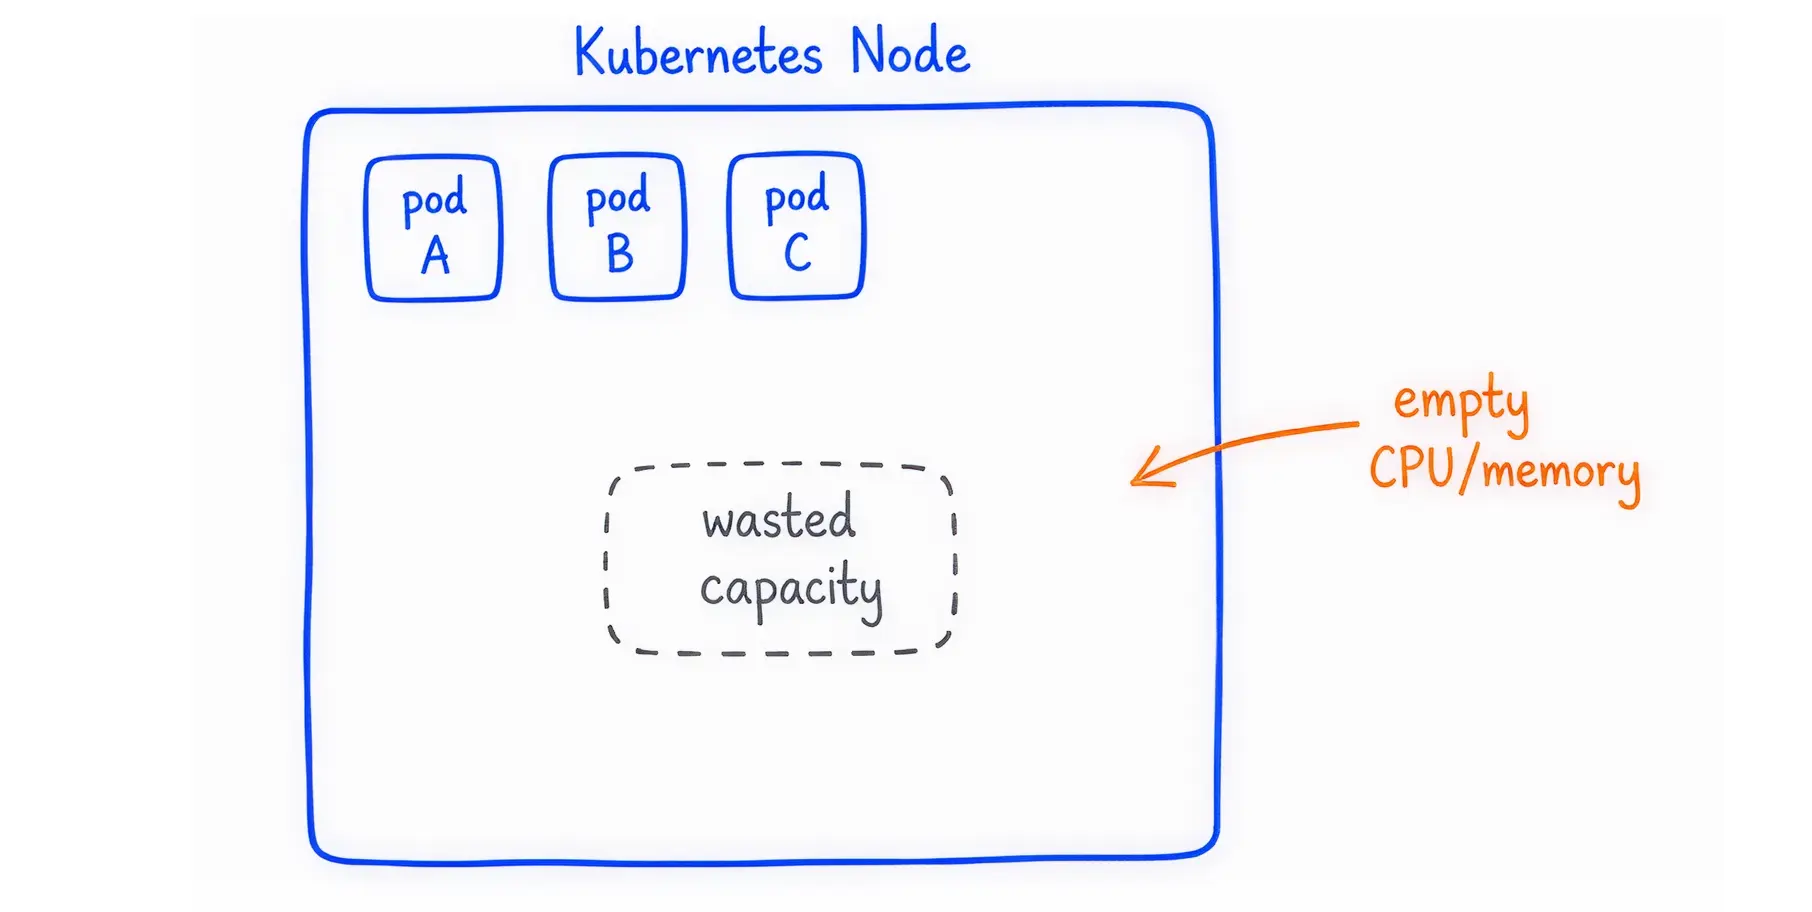
This creates poor bin packing efficiency. Bin packing refers to how tightly you can fit your applications onto the underlying cloud servers. If every application requests a massive server but only uses 10% of it, your cloud servers run mostly empty. You pay the cloud provider for empty space. Follow this Kubernetes Cost Optimization guide to reduce idle capacity and improve cluster efficiency.
To fix this, you must understand how Kubernetes controls resources. The system uses two specific settings for every application: Requests and Limits.
Resource Requests: This is the minimum amount of CPU or memory the application needs to start. The Kubernetes scheduler uses this number to find a server (a node) with enough available space. Think of this as reserving a table at a restaurant.
Resource Limits: This is the absolute maximum amount of CPU or memory the application is allowed to consume. Think of this as the maximum occupancy limit for a building.
CPU is measured in millicores (or CPU Shares). One full CPU core equals 1000 millicores. Memory is measured in Mebibytes (MiB) or Gibibytes (GiB).
Kubernetes uses these settings to assign a Quality of Service (QoS) Class to your application:
Failing to set these numbers correctly causes immediate problems for your business.
Over-provisioning: leads to wasted schedulable capacity. If your engineering team requests 4 CPUs for an application that only uses 0.5 CPUs, the cloud provider reserves all 4 CPUs. The remaining 3.5 CPUs cannot be used by other applications. Your cloud bill inflates silently.
Under-provisioning: destroys your application reliability. If you set the limits too low, the system intervenes aggressively:
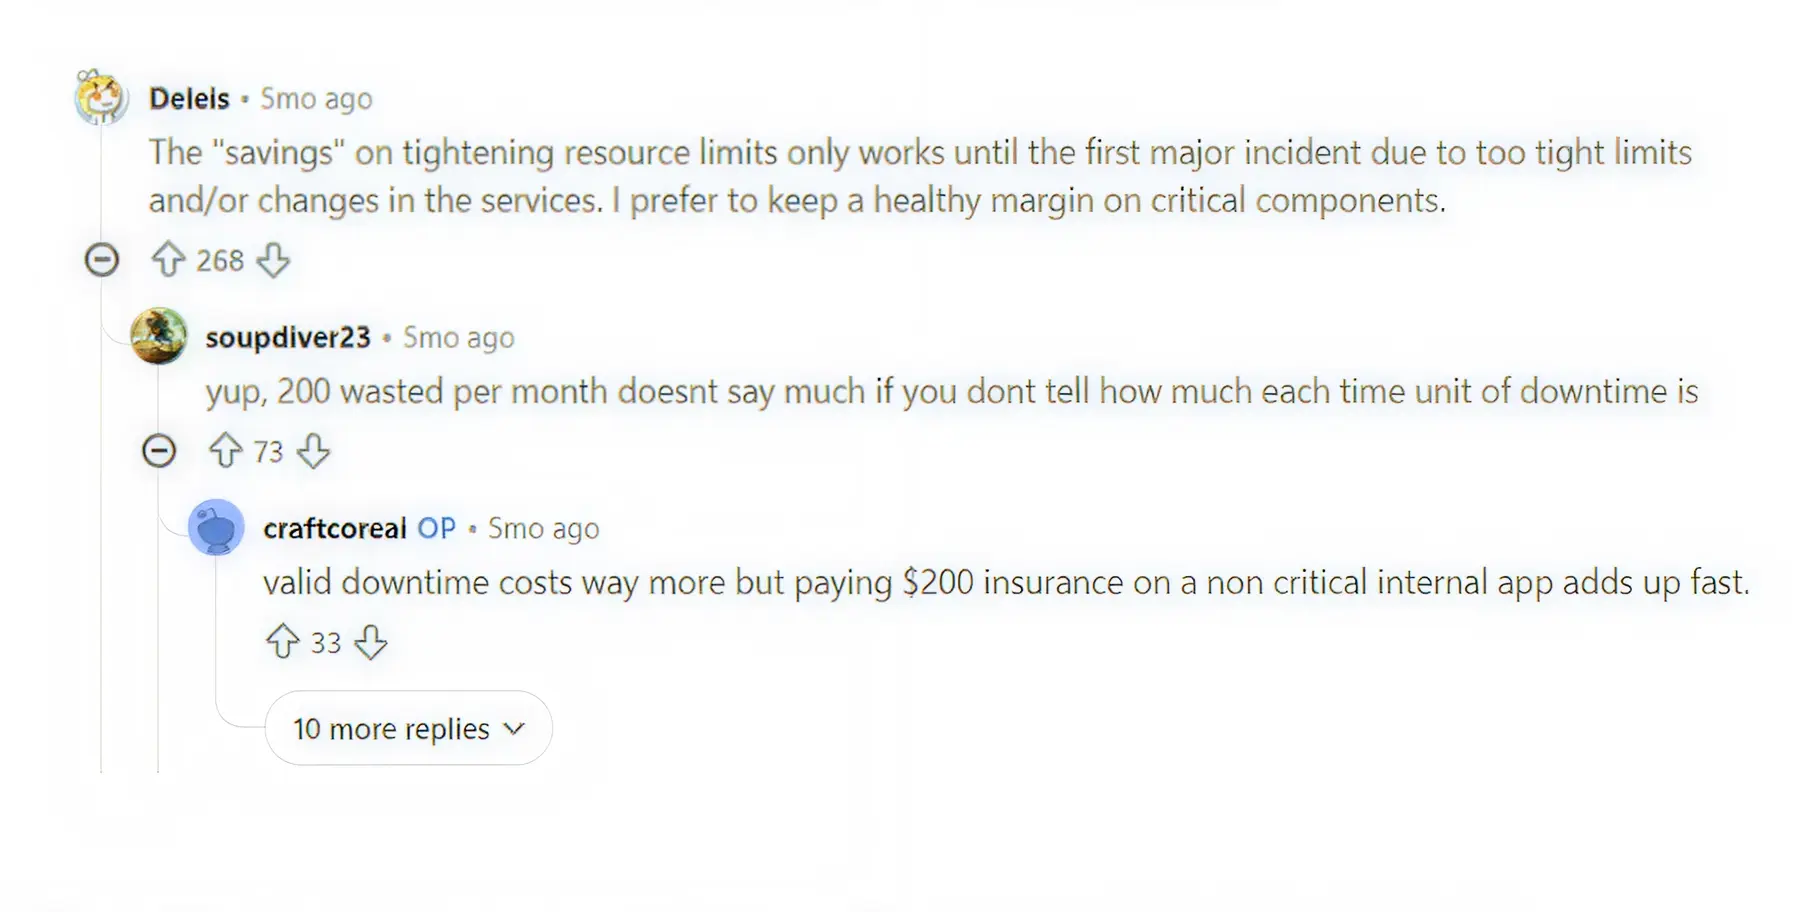
This tension is visible daily among engineering teams. An SRE on Reddit recently explained the risk: "The savings on tightening resource limits only work until the first major incident due to too-tight limits. I prefer to keep a healthy margin on critical components."
Kubernetes provides a built-in tool to address this sizing problem: the Vertical Pod Autoscaler (VPA). The VPA automatically adjusts the CPU and memory reservations for your applications based on their historical usage.
The VPA operates using three distinct components that work together:
You can instruct the VPA to behave in four different ways depending on your risk tolerance:
Off: The VPA only calculates recommendations. It does not apply any changes to your running applications. You must apply the recommendations manually.
Initial: The VPA applies its recommendations only when an application starts for the first time. It never updates a running application.
Recreate: The VPA terminates your running applications and restarts them with the new resource settings.
Auto: Currently, this functions identically to the "Recreate" mode. It restarts pods to apply new settings.
While the VPA sounds like a perfect automated solution, many businesses turn it off after trying to use it. Relying on native VPA in a live, customer-facing environment introduces severe technical risks.
As one engineering consultant noted regarding common production fires: ‘Most devs set limits based on vibes, not data. Add VPA in recommendation mode first before touching anything.’
The most significant flaw of the traditional VPA is how it applies changes. To give an application more memory, the VPA must destroy the application and recreate it.
If you run a stateless website with dozens of copies running simultaneously, destroying one copy is barely noticeable. However, if you run a large database, a StatefulSet, or a critical batch-processing job, destroying it mid-task can cause data corruption or transaction failures.
Frequent restarts also violate your Pod Disruption Budgets (PDB), which are rules designed to ensure a minimum number of applications remain online.
The VPA Recommender is not instantly smart. It relies on mathematical models called decaying histograms to understand your application's behaviour.
To make a highly accurate recommendation that accounts for weekly traffic spikes, the VPA typically needs about eight days of historical metrics data from a tool like Prometheus.
If you turn on VPA and immediately apply its recommendations on day two, it might severely under-provision your application because it has not yet witnessed your Friday afternoon traffic surge.
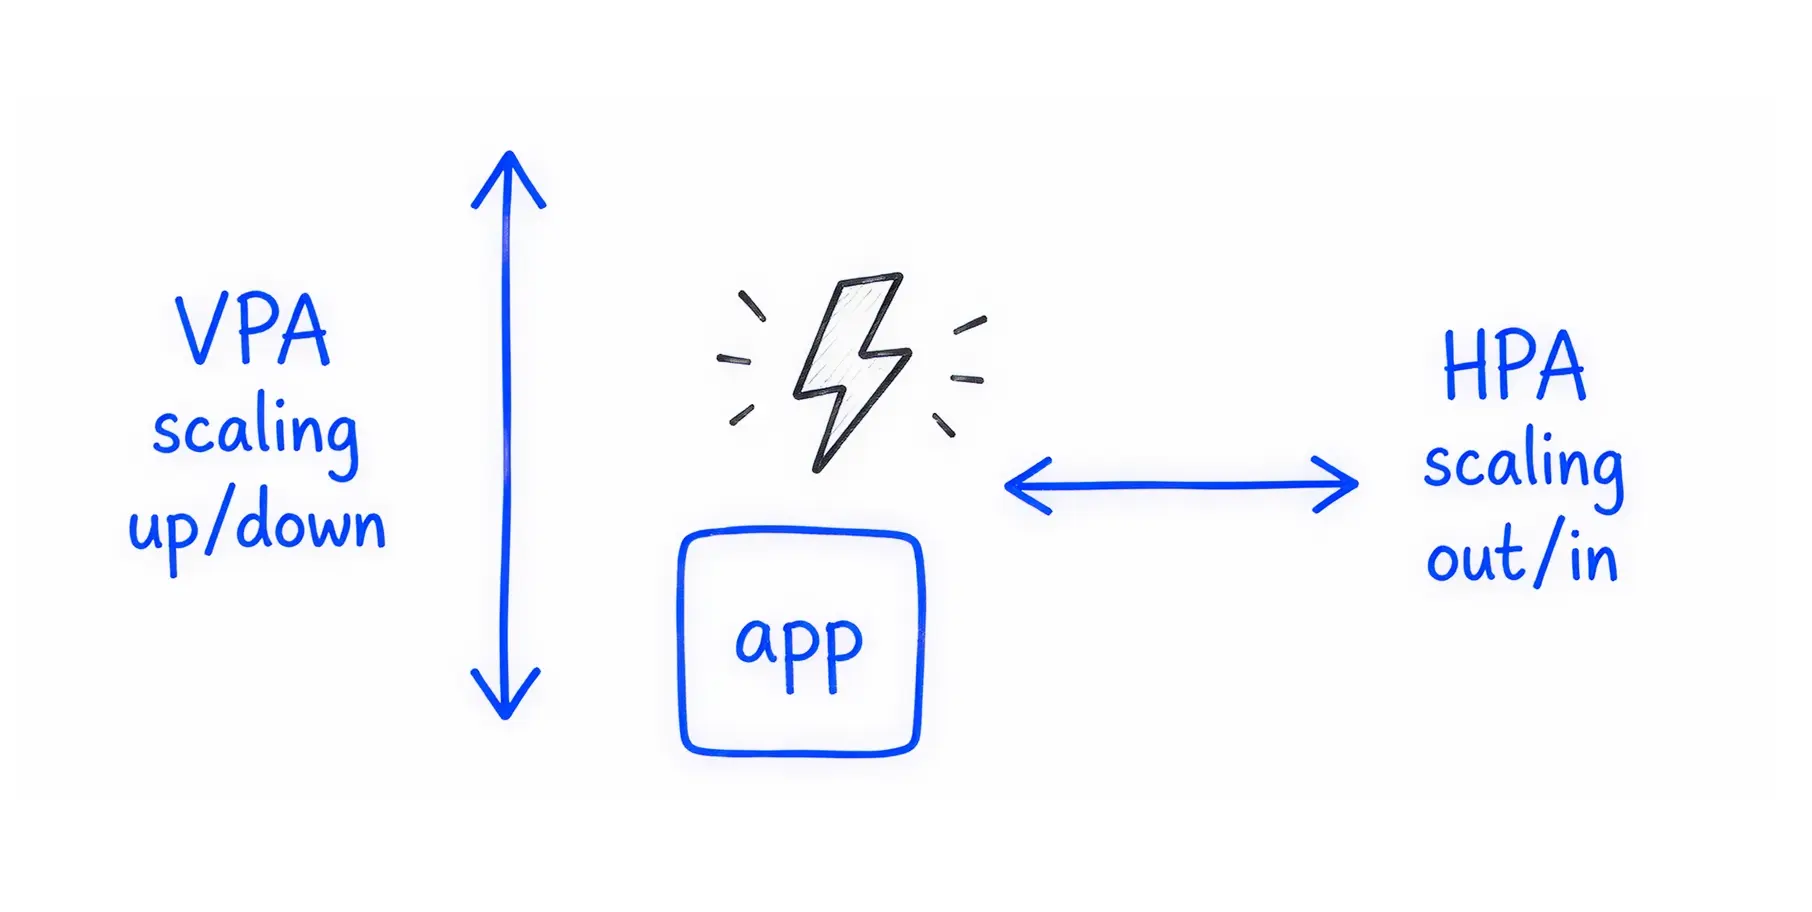
Kubernetes has another tool called the Horizontal Pod Autoscaler (HPA). While VPA makes an application bigger, HPA makes more copies of the application.
If you configure both VPA and HPA to react to CPU usage, they will fight each other.
For example, if CPU usage spikes, the HPA will add five new copies of the application to handle the load. At the exact same time, the VPA will increase the CPU limit on the existing applications and restart them. The system thrashes, wasting compute instances and causing instability.
Karpenter and the Cluster Autoscaler are tools that buy new servers from your cloud provider when your applications need more room.
If your VPA generates a wildly inaccurate recommendation, for instance, asking for 16 CPUs due to a temporary memory leak, it will force your application into a pending state. Karpenter will see this massive request and automatically purchase a highly expensive cloud instance, such as an AWS m5.12xlarge, to accommodate it.
Without strict caps, an automated VPA can multiply your monthly cloud bill overnight.
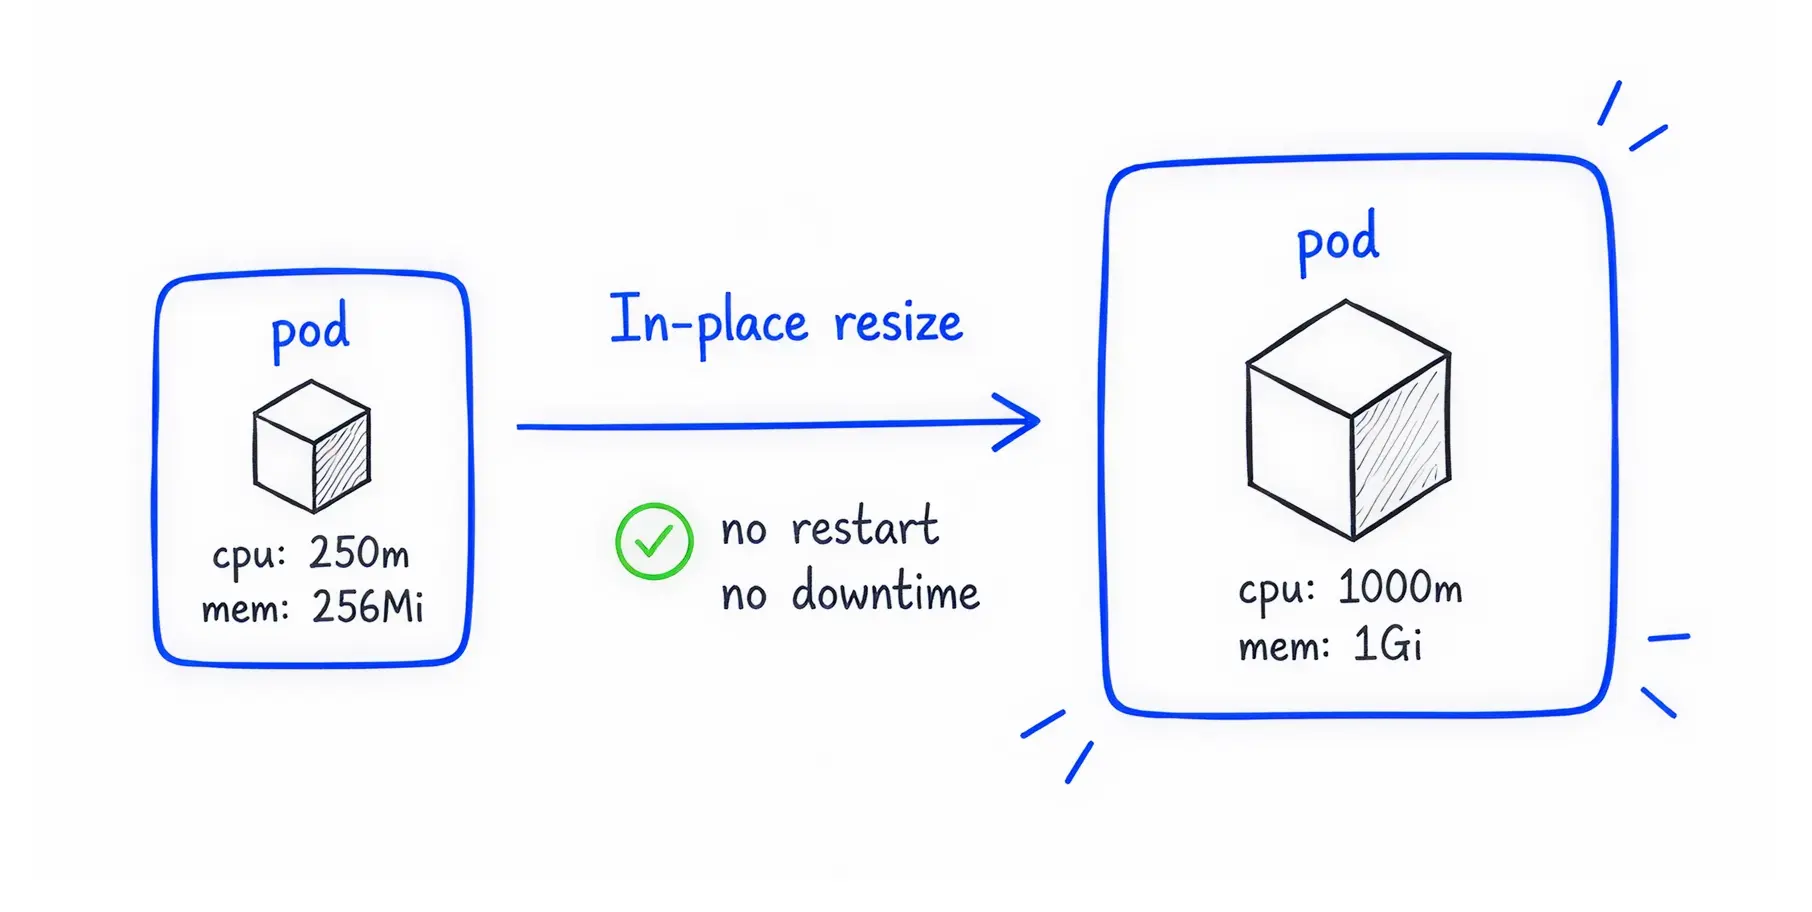
The Kubernetes development community recognised the disruptive nature of the restart problem. They built a solution that graduated to Beta in Kubernetes v1.33 and reached stable status in Kubernetes v1.35.
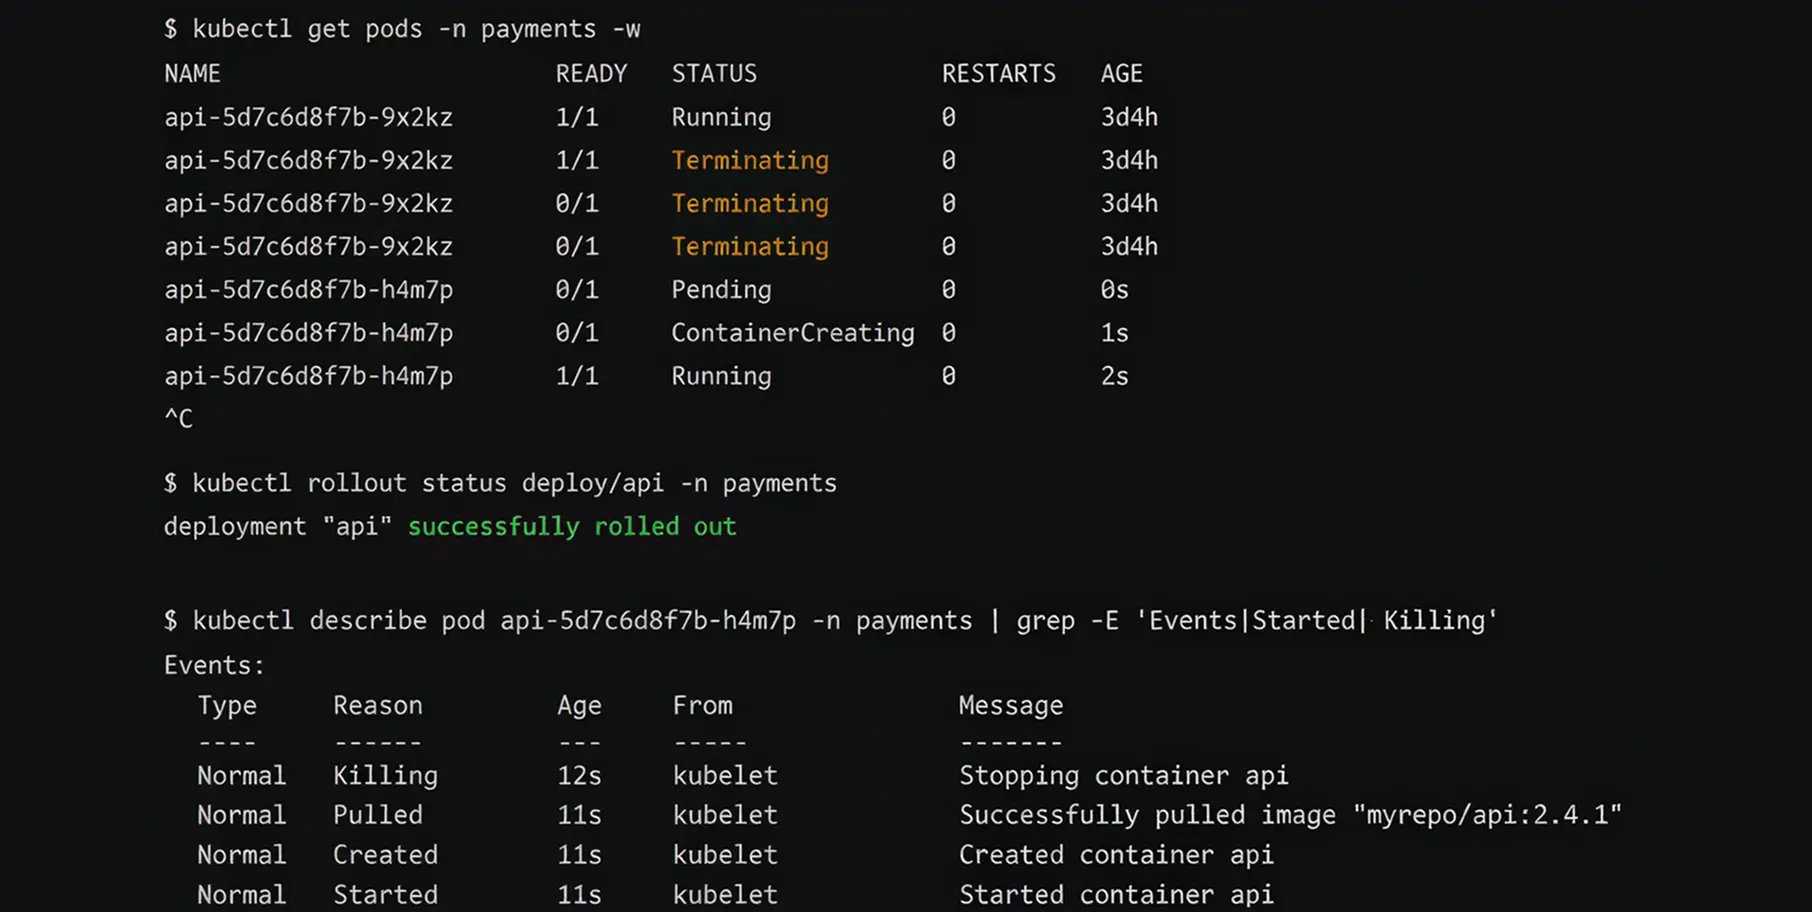
In-Place Pod Resize lets you adjust the CPU and memory requests of a running application on the fly.
Technically, it allows systems to modify the spec.containers[].resources values without taking the application offline. The underlying server simply allocates more or less of its physical capacity to the container in real time.
This feature completely changes how businesses manage cloud costs. Because the application never stops running, you eliminate downtime risk for stateful databases, DaemonSets, and long-running batch-processing CronJobs.
You can scale down resources during quiet night hours and scale them up during the morning rush, capturing massive FinOps savings without ever interrupting the user experience.
For cost optimisation, you need a safe, repeatable process. Follow these steps to rightsize your workloads without breaking production.
You must measure the actual consumption of your software. You need observability tools like Prometheus, Grafana, Metrics Server, and kube-state-metrics installed in your cluster.
Do not look at average CPU usage. Averages hide dangerous spikes. Instead, focus on P95 or P99 resource consumption metrics. The P99 metric shows you the maximum resources your application needed 99% of the time. You should base your sizing decisions on these high-water marks to ensure reliability.
Never let a sizing tool change your production environment automatically on day one. Deploy the native Vertical Pod Autoscaler, but set the operating mode to "Off" only.
In this mode, the VPA acts as an advisor. Let it monitor your Dev or Staging environments for a full week. Review its recommendations manually to see if they align with your expectations.
Before you apply any sizing changes, you must protect your cloud bill from rogue automation.
Use Kubernetes LimitRanges and Resource Quotas per Kubernetes Namespace. These rules act as a hard ceiling for an entire department. Even if a misconfigured VPA asks for 50 CPUs, the Namespace Resource Quota will block the request, preventing tools like Karpenter from provisioning expensive cloud nodes.
Do not manually edit live cluster settings. Use GitOps principles to manage your infrastructure.
When your sizing tool recommends a change, that recommendation should be converted into a code update via a Pull Request. Tools like Argo CD or Flux can then read this approved code and apply the rightsizing changes systematically.
This creates an audit trail, allowing you to easily revert the change if performance drops.
Standard rightsizing works well for simple web servers. However, enterprise environments run complex, unpredictable workloads. Here is how experienced operators handle difficult scaling scenarios.
Applications built with Java (JVM) or Spring Boot exhibit severe workload volatility. When a Java application starts, it requires a massive amount of CPU to compile its code. Once it is running, its CPU usage drops to almost nothing.
If you set a static CPU limit based on the low running usage, the application will take ten minutes to start due to severe CPU throttling. If you set the limit high to accommodate the startup, you waste money.
The solution is to use a "CPU Boost" strategy or leverage in-place resizing. You allow the application to request high CPU during initialisation, and then an automated tool immediately scales the CPU limit down once the application reports it is healthy.
As discussed, VPA and HPA fight if they both monitor CPU usage. To resolve this, separate their responsibilities.
Let the VPA handle CPU and memory sizing. Then, install KEDA (Kubernetes Event-driven Autoscaling). Configure KEDA to trigger the HPA based on custom, external business metrics instead of CPU.
For example, KEDA can scale the number of your applications based on the depth of an incoming message queue or the number of active HTTP requests. This stops the tools from conflicting
When traffic spikes unexpectedly, you need new applications instantly. However, cloud providers take a few minutes to boot up physical compute instances.
To solve this, operators use "Balloon Pods". These are low-priority, dummy applications that do absolutely no work. They exist solely to reserve space on your cloud servers. When a real, high-priority application needs to start urgently, Kubernetes immediately evicts the BestEffort dummy pod, giving the critical application instant access to pre-warmed server space.
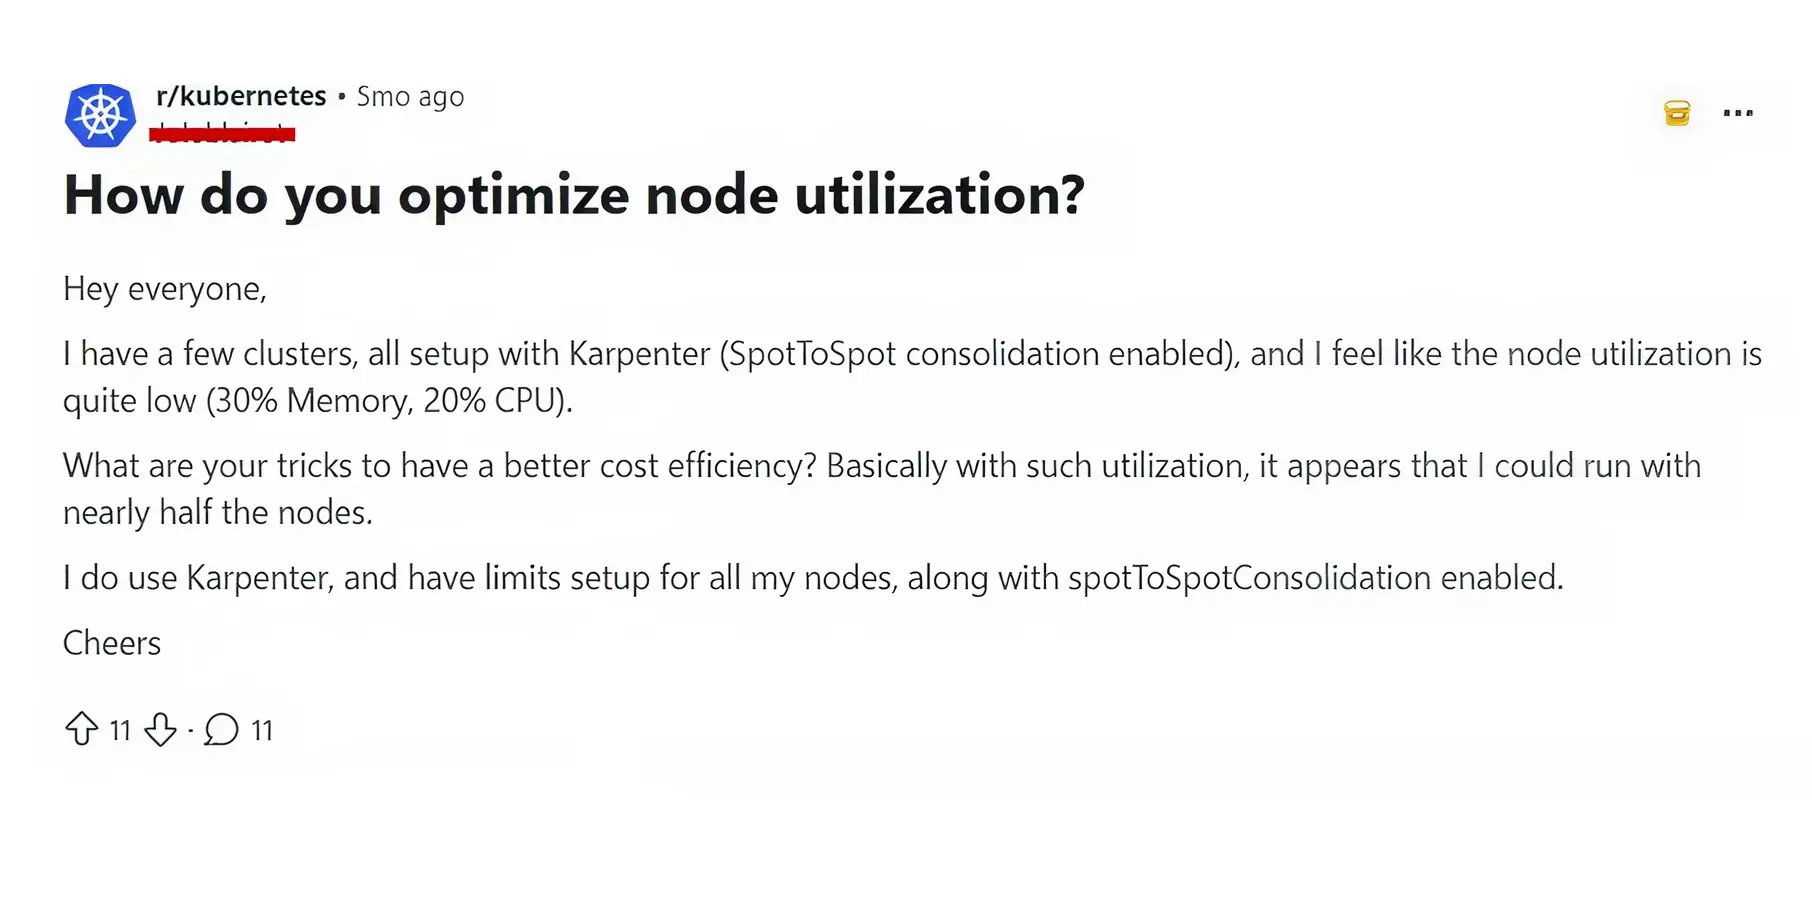
Regarding node efficiency, an engineer on Reddit noted, "Basically, with such utilisation, it appears that I could run with nearly half the nodes. I do use Karpenter, and have limits set up for all my nodes."
Balloon pods help ensure nodes are utilised effectively while retaining emergency capacity.
Choosing the right software dictates how successfully you will manage your cloud spend. The market offers tools ranging from simple advisory dashboards to full artificial intelligence platforms.
If you only want visibility and prefer to make changes manually, open-source tools provide a good starting point.
Manual adjustments do not scale in a business running hundreds of applications. Enterprise platforms execute changes in real time.
To ensure stability, follow these final rules.
For your most critical production databases and payment processing APIs, do not try to save money by setting request limits below their limits.
Set your memory requests to exactly match your memory limits. This assigns the Guaranteed Quality of Service class to the application. If the underlying server runs out of memory, Kubernetes will never terminate a Guaranteed application. It will evict lower-priority tasks instead, protecting your revenue-generating systems from unexpected OOMKills.
You cannot automate everything on day one. Group your applications by their risk profile to plan your automation strategy.
Kubernetes rightsizing is not a one-time project. Workloads change daily, code updates alter memory usage, and cloud pricing fluctuates. Attempting to manage this complexity manually will result in overpaying the cloud provider and risk application downtime.
You need continuous resource optimisation. By understanding the boundaries of requests and limits, leveraging in-place pod resizing, and avoiding HPA and VPA conflicts, you protect both your budget and your uptime.
If you’re seeking automation, then you have tools like Costimizer that replace manual work and reactive alerts with an Agentic AI that actively fixes cloud waste. From Kubernetes workload optimisation to shutting down zombie resources across AWS, GCP, and Azure, Costimizer delivers guaranteed savings without requiring a dedicated FinOps team.
Connect your cloud account in just a few minutes and let Costimizer uncover your hidden savings today.
Not if done correctly. Modern methods change server limits while your software is running. Your customers will never notice the change, but your finance team will.
Costimizer uses AI to watch your software traffic 24/7. It learns your busiest and slowest times, calculating the exact minimum space required to keep your business running smoothly.
You will see savings in your very next invoice. Once you remove the unused server space, the cloud provider stops charging you for it immediately.
Costimizer never removes your safety nets. It respects the strict budget rules you set and allows your software to grab emergency power instantly if a massive traffic spike occurs.
They can, but it wastes their valuable time. Manual sizing forces your highest-paid engineers to stare at charts instead of building new features for your customers.
Yes, it connects to AWS, Azure, and Google Cloud in minutes. You get a single dashboard that shows your entire company's cloud waste, regardless of provider.
No. Engineers buy extra server space to ensure your website never crashes. They overspend because they lack the right tools to safely balance costs with uptime.
No, you are in full control. You can run Costimizer in "read-only" mode to review the exact dollar savings before making changes. You only turn on automation when you feel ready.
•
CFO•
Articles