For many CXOs, cloud spending has become the highest variable cost on the balance sheet. A recent industry survey shows 82% of companies report higher cloud bills than they planned for.
This happens because Kubernetes is designed for performance, not financial efficiency. By default, it will consume as much compute and memory as you allow. To regain control, you must start managing it as a predictable financial asset.
This blog will explain exactly how you can implement automated kubernetes cost optimisation. We will also provide clear, practical steps to gain financial control. You will learn how to reduce your cloud spend while maintaining complete application stability.
60-Second Summary:
Before we step into finding ways to change how we work need to understand the problem.
You need to know that if your monthly bill is climbing, it is almost always a failure of process.
Kubernetes allows your development team to deploy code rapidly. A junior engineer can instantly provision powerful servers via an API. In the past, buying a physical server took weeks of budget approvals. The slow process saved money. Now, that friction is gone.
This creates a direct conflict between velocity and efficiency. Engineers optimize for speed and uptime. They want their applications to run perfectly during peak traffic. To guarantee this, they order far more infrastructure than the application actually needs.
Industry benchmarks place unallocated or idle spend at 35% to 50% of total cluster cost. It’s like you are paying for a Maserati, but you are leaving it parked in the garage.
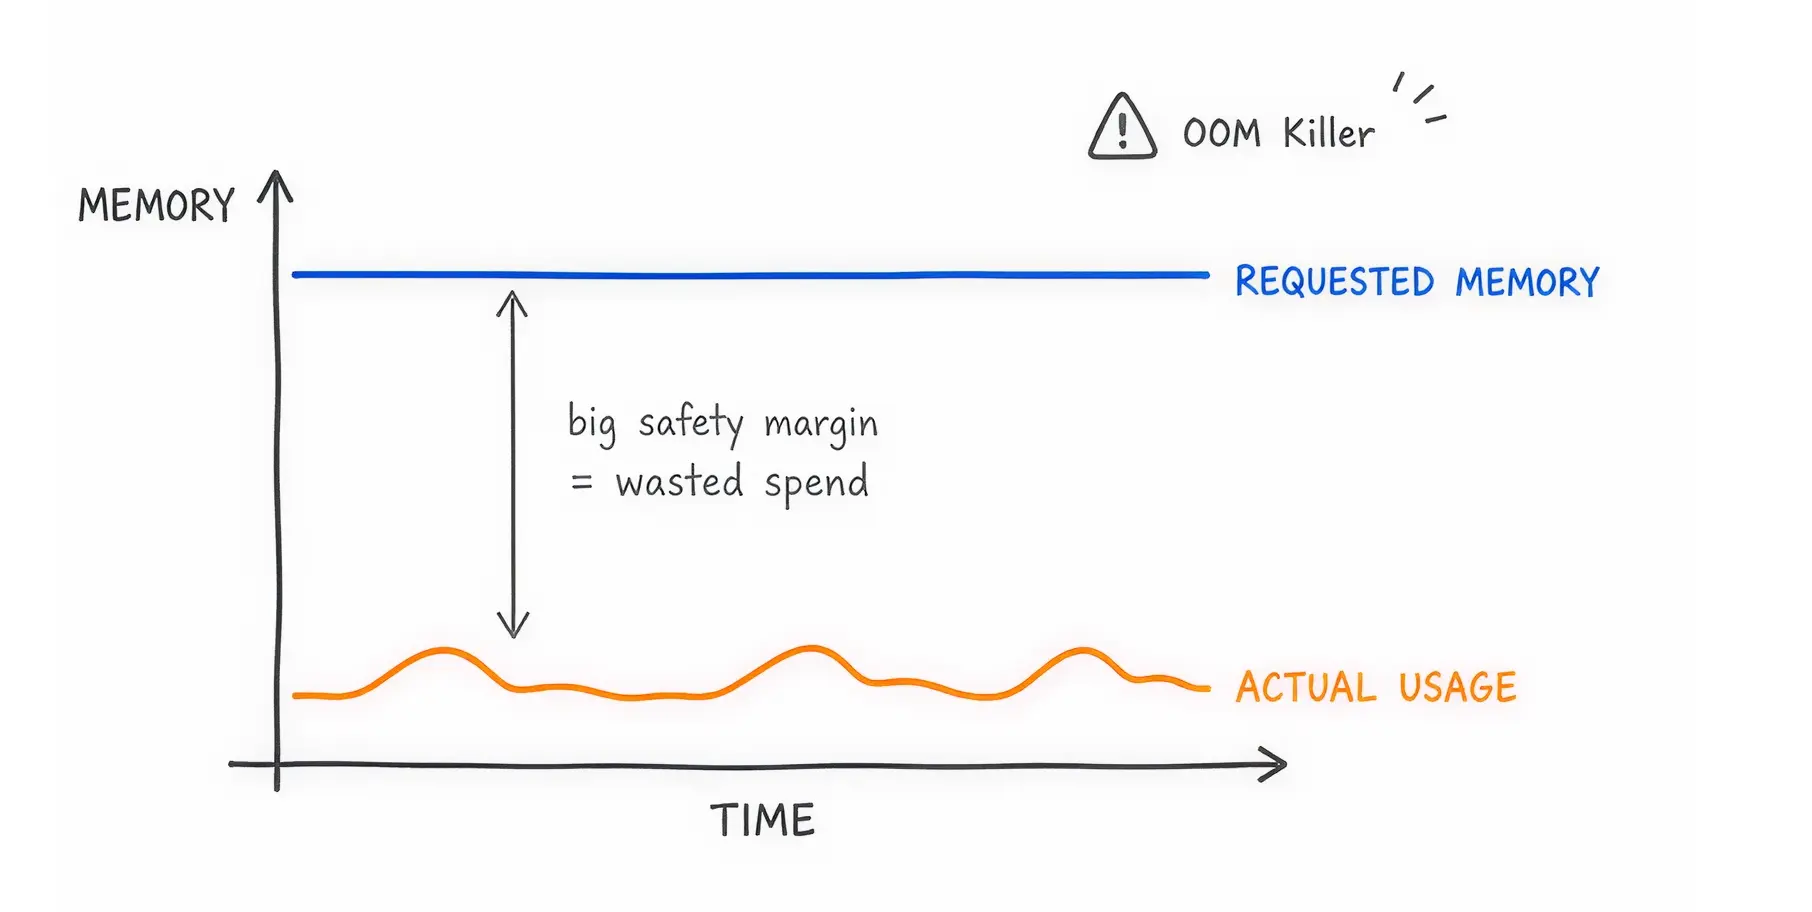
Every application running in Kubernetes needs a defined amount of CPU and memory. If an application uses more memory than it requested, a system process called the OOM (Out of Memory) Killer terminates it immediately.
Engineers hate application crashes. They hate fixing a broken production environment very frequently. To prevent the OOM Killer from touching their applications, developers pad their resource requests with massive safety margins. If an application needs 2 gigabytes of memory, an engineer might request 8 gigabytes just to be safe.
The cloud provider charges you for the 8 gigabytes requested, even if the application only uses 2 gigabytes. This fear directly causes massive overprovisioning across your entire organization.
You cannot fix what you cannot measure. Before making technical changes, you must establish financial clarity. Here is how you can do that.
FinOps is a financial management practice for the cloud. It forces finance, engineering, and business leadership to work together.
The goal is to make cost a primary metric in software engineering, alongside speed and security. Engineers must understand that code decisions are buying decisions.
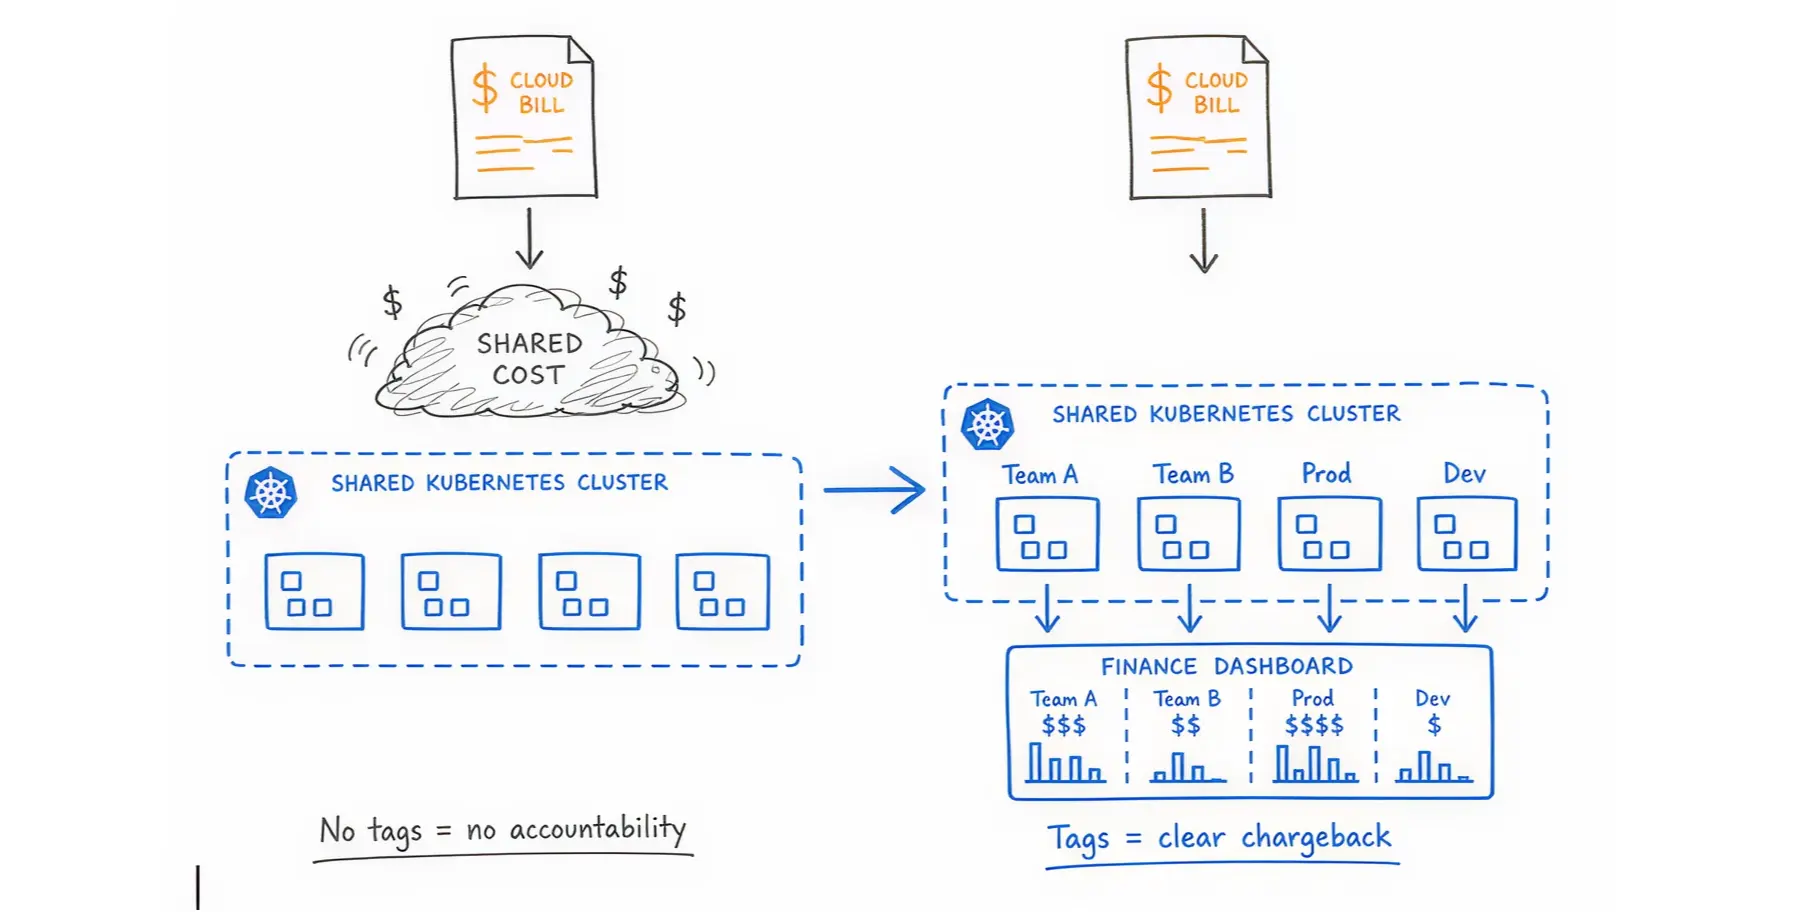
To figure out who is spending what, you must label your resources. In Kubernetes, you organize resources using Kubernetes Namespaces (virtual clusters) and Labels (tags).
You must enforce a strict kubernetes tagging strategy across all workloads.. Every application must have a tag identifying the owner, the department, and the environment (like "production" or "testing"). If an application lacks a tag, the system should block its deployment. This allows finance to run accurate chargeback reports.
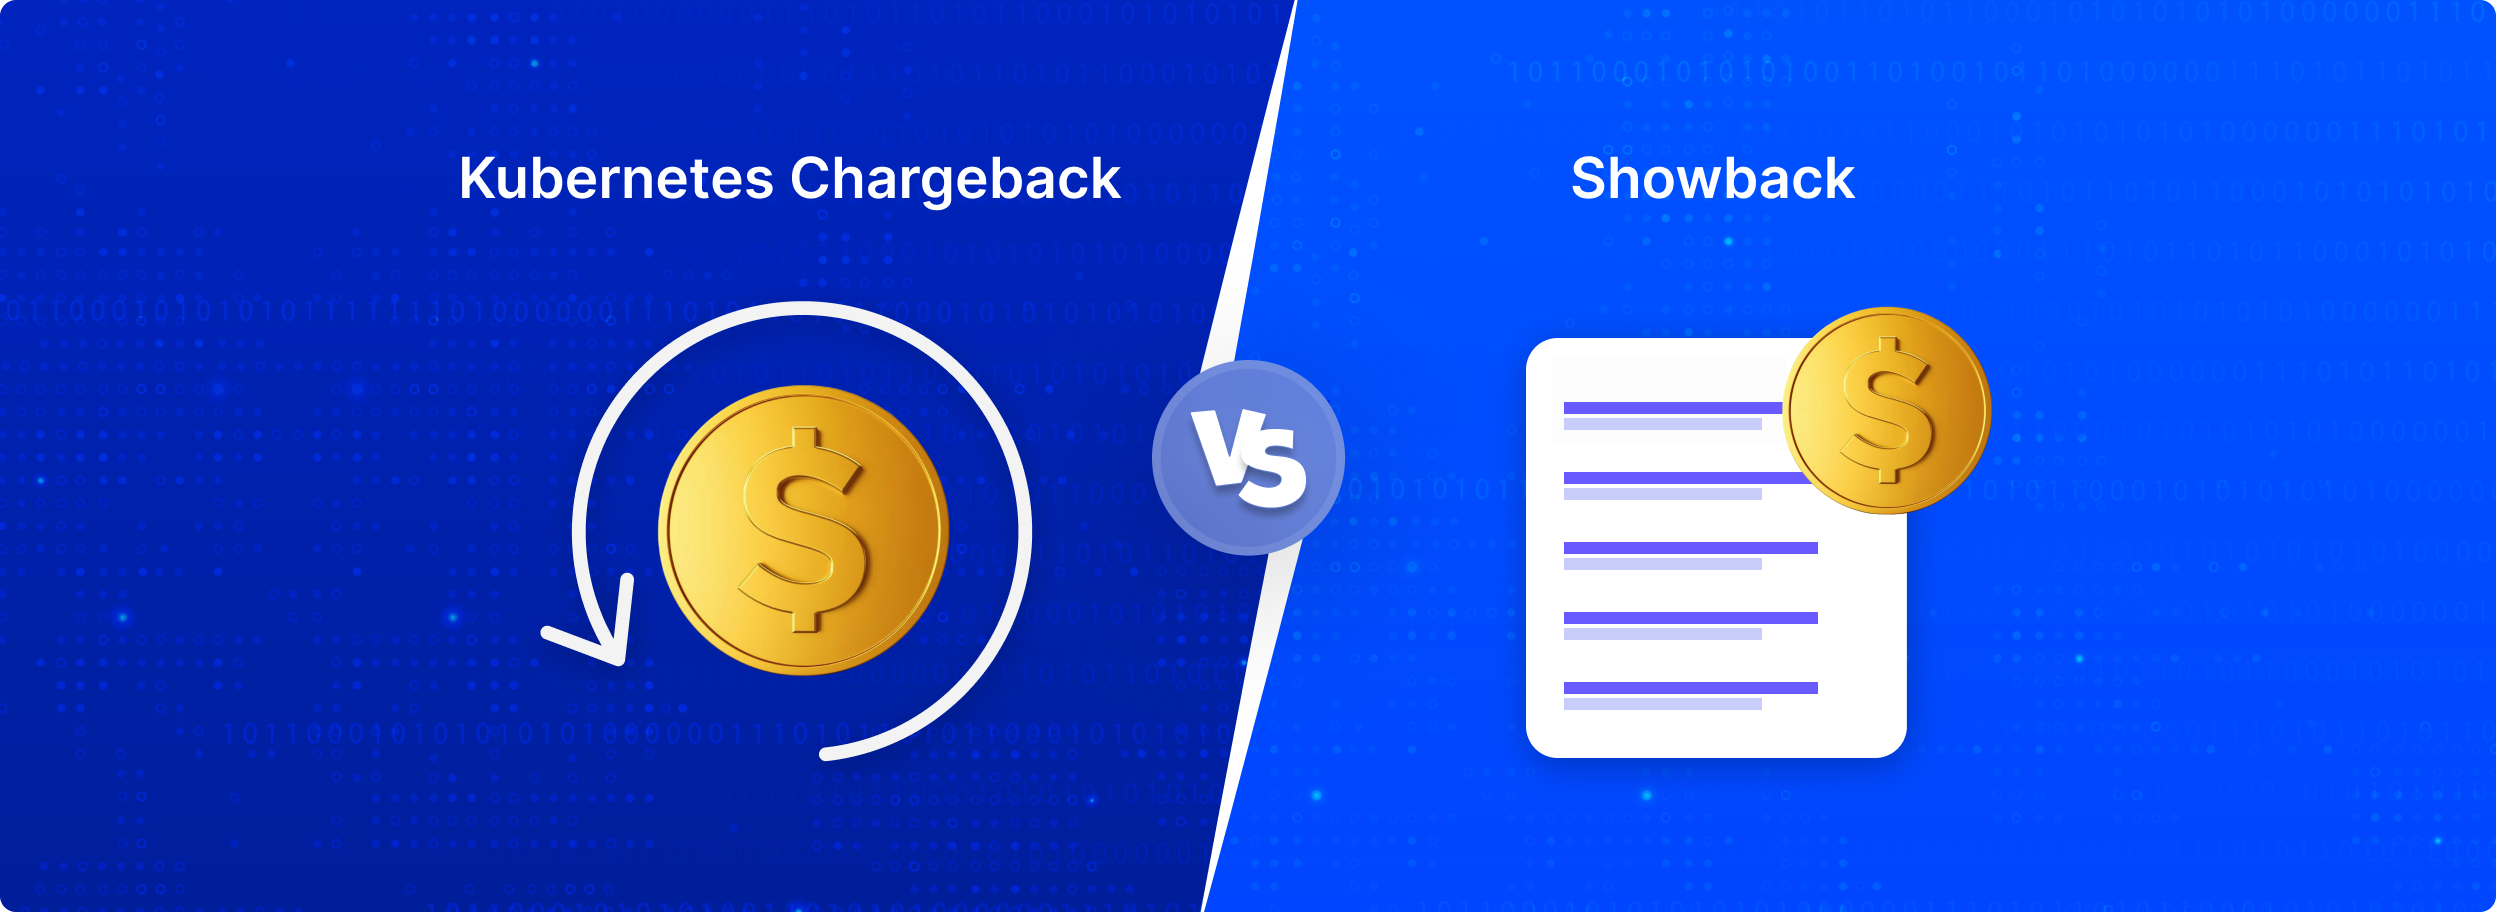
Dive In More: Kubernetes Chargeback vs. Showback
Our DevOps team lead, Saim, shared, “The moment we forced every dev team to tag their namespaces, our monthly bill dropped by 12%. People suddenly cared when the bill had their name attached to it.”
You must have a dashboard that translates technical usage into dollars. Connect your cloud billing APIs with your cluster metrics. This shows you exactly how much a specific application costs per hour.
Real-World Solution: If manual tagging fails, use an automated platform. Costimizer offers a Virtual Tag Governance feature that identifies untagged resources and automatically categorizes them based on historical patterns, giving finance 100% visibility without slowing down engineers.
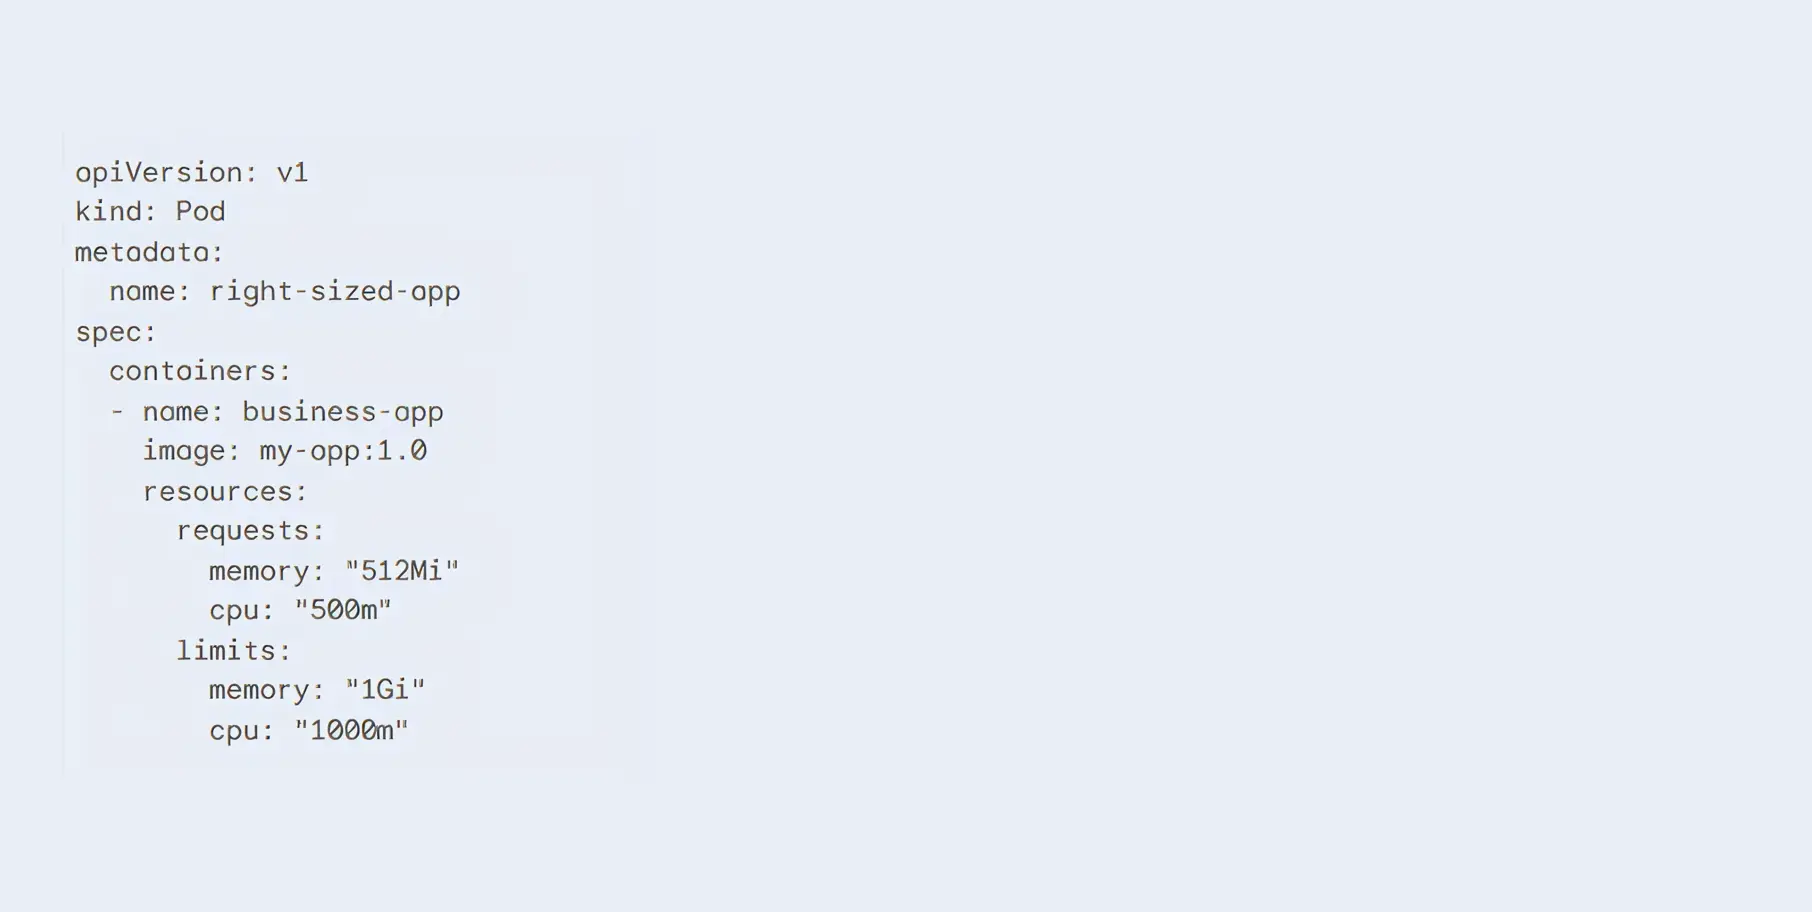
Kubernetes pod rightsizing means matching your requested server capacity to your actual application needs
Use monitoring tools like Prometheus and Grafana to track actual historical usage. Look at the last 30 days of data. If an application requested 10 CPUs but never used more than 2 CPUs during peak traffic, you have found an immediate opportunity to cut costs.
In Kubernetes, you define resource needs using "Requests" and "Limits".
Set the Request closely to the actual baseline usage. Set the Limit slightly higher to handle sudden traffic spikes.
Example YAML Configuration for Right-Sizing:
Our Solution: Analyzing hundreds of applications manually is slow and error-prone. Costimizer uses Agentic AI to constantly monitor your Kubernetes workloads. It automatically recommends the exact CPU and memory numbers you should use based on actual demand, guaranteeing performance while cutting waste.
Your traffic changes throughout the day. Your infrastructure should automatically expand and shrink to match it.
Kubernetes offers two main ways to scale your applications automatically.
Using them together is dangerous if configured poorly. If both HPA and VPA monitor the same metric (e.g., CPU usage), they will compete with each other. VPA will try to add more CPU to the pod, while HPA will try to copy the pod. This causes system instability.
The safe method is separation. Use VPA to automatically manage memory needs, and use HPA connected to custom business metrics (such as active user sessions) to handle traffic volume.
Sometimes, CPU is the wrong metric to watch. If you run a background application that processes customer orders, you should scale based on the number of orders in the queue.
KEDA (Kubernetes Event-driven Autoscaling) allows you to do this. It monitors external systems. If the queue is empty, KEDA scales your application down to zero. You pay nothing. When 500 orders arrive suddenly, KEDA instantly wakes the application to process them.
Once your applications are sized correctly, you must ensure the physical servers underneath them are purchased efficiently.
When your applications need more room, Kubernetes must order new servers from the cloud provider.
Saim (Our DevOps Expert) shared that he swapped the Cluster Autoscaler for Karpenter. Node spin-up time went from 3 minutes to 45 seconds, and their compute bill dropped 20% because it bin-packs pods so aggressively.
Do not use the same expensive server type for everything. Modern cloud providers offer processors built on the ARM architecture (such as AWS Graviton). These processors handle common workloads faster and use less electricity. Switching compatible applications to Graviton instances routinely yields 20% better price performance.
Mix standard Intel and ARM processors with specialized GPU instances based on exactly what the application requires.
Spot instances are spare, unused servers that cloud providers sell at massive discounts (up to 90% off).
The catch? The provider can take the server back at any time with only a two-minute warning.
You cannot run a database on a Spot instance. If the server is returned, the data becomes corrupted.
However, Spot instances are ideal for stateless applications, such as web servers or background workers. If one web server dies, Kubernetes simply starts another elsewhere.
You must instruct Kubernetes on where to place different applications.
Use "Taints" and "Tolerations". You taint a Spot server to say, "Only easily replaceable applications can run here." You configure your critical payment-processing application to specifically require a stable, on-demand server. This keeps risk perfectly isolated.
When a cloud provider recalls multiple Spot instances at once, you risk losing all copies of a specific application. A Pod Disruption Budget (PDB) prevents this.
It serves as a strict rule: Never allow the number of running copies of this application to drop below 2. This forces the autoscaler to keep your application alive during infrastructure chaos.
Manually stopping waste takes too much time. You need automated rules.
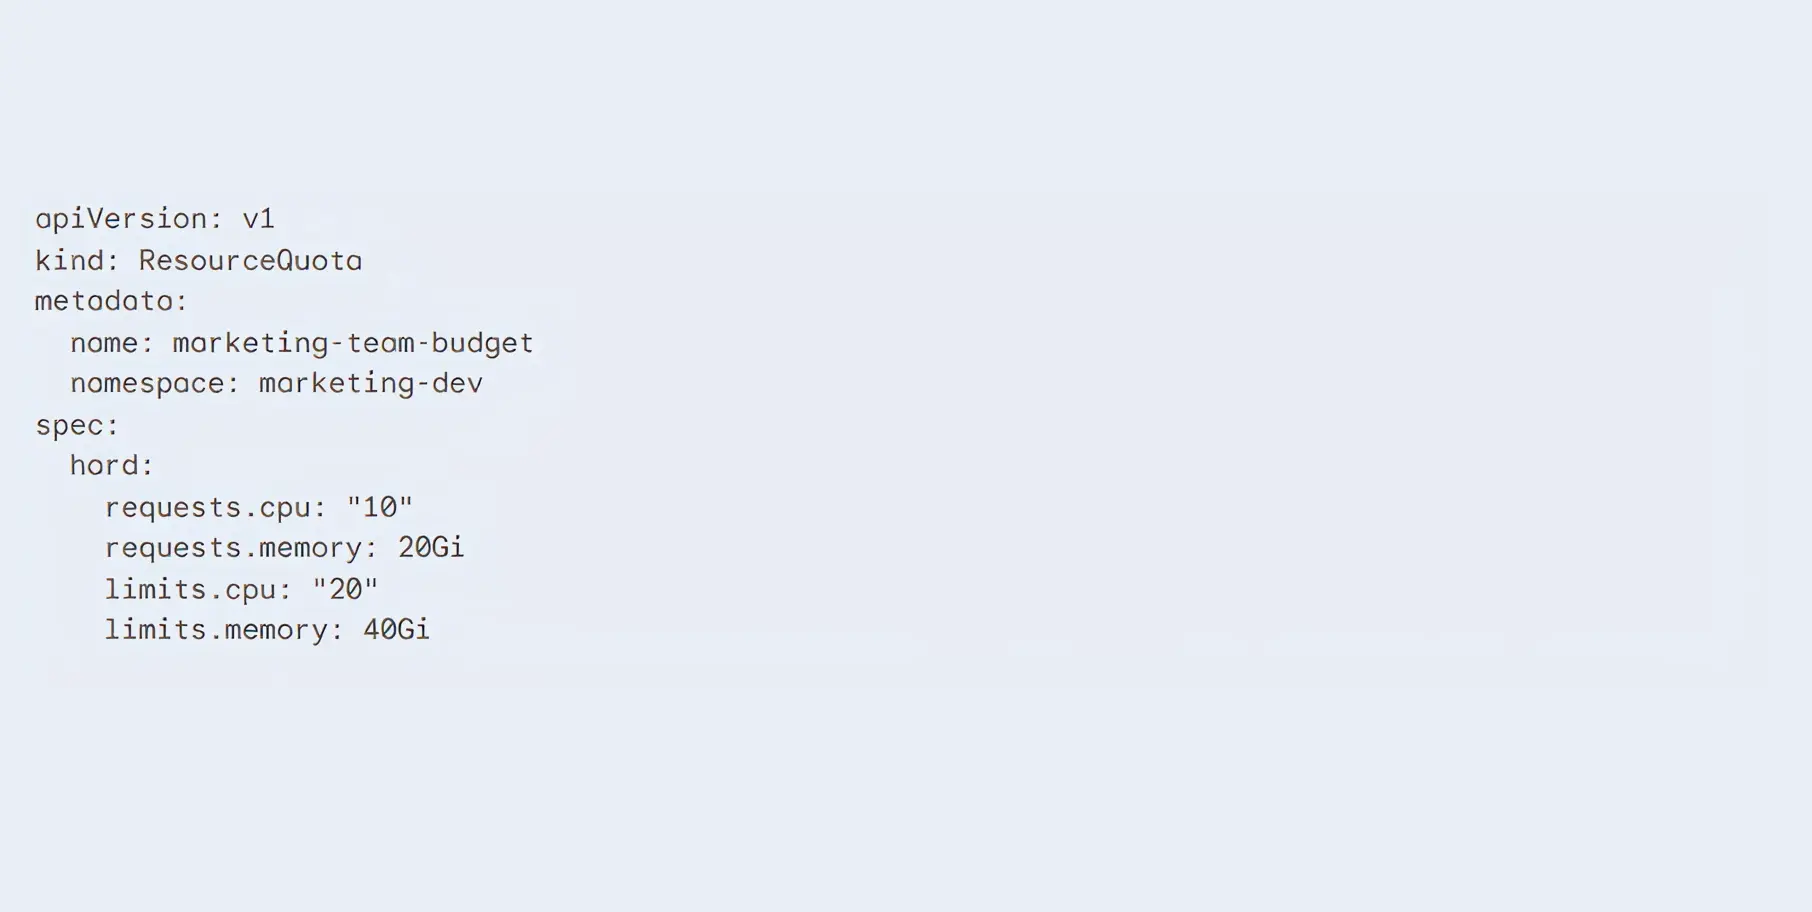
A ResourceQuota is a strict budget applied to a specific team or project namespace.
It says, The marketing development team is only allowed to use a maximum of 10 CPUs total. Once they hit the limit, Kubernetes physically blocks them from starting new servers.
Example YAML Configuration for a ResourceQuota:
Use tools like Open Policy Agent (OPA) or Kyverno. These tools scan code before it is allowed to enter your system. If an engineer tries to deploy an application that requests a massive, $1,000-a-month database without the required budget approval tags, Kyverno will automatically reject the code deployment.
This stops financial waste in the continuous integration pipeline before a single dollar is spent.
A zombie deployment is an application or storage drive that is running, fully paid for, but completely unused by any actual human or system.
When developers delete an application, they frequently forget to delete the attached storage drive (Persistent Volume Claim, or PVC).
The cloud provider continues billing you for that data storage month after month. You must run weekly automated scripts to identify storage volumes that have not been attached to a running application for more than 7 days, and delete them.
Your developers work from 9:00 AM to 5:00 PM. Yet, their testing and development servers remain running all night and all weekend. There are 168 hours in a week. If developers only work 40 hours, you are paying for 128 hours of pure waste.
Real-World Solution: Implement automated cloud power schedules. Costimizer allows you to set automated Time-to-Live (TTL) policies. It automatically shuts down development clusters every Friday evening and powers them back up Monday morning, cutting your non-production compute bill by up to 70%.
When reviewing the total bill, CXOs often wonder whether they should stop paying cloud provider fees and manage servers themselves.
Cloud providers charge a premium for managing the difficult parts of Kubernetes (the control plane). They also mark up the price of the virtual machines. You pay this premium for convenience, security patches, and instant technical support.
Before leaving a managed service, exhaust your discount options. Commit to using a certain amount of capacity for one to three years using AWS Savings Plans or Reserved Instances.
These financial commitments immediately lower your hourly rate by up to 50% without requiring any technical changes to your architecture.
Can you save money by renting bare-metal servers from alternative providers like Hetzner or OVH and installing Kubernetes yourself?
When you move from AWS EKS to self-hosted Ubuntu servers on Hetzner. You would notice that the raw compute bill dropped by 70%. But you may have to hire two more senior infrastructure engineers just to keep the cluster from crashing during updates.
The raw server cost is cheaper. However, the total cost of ownership is often higher. You must pay salaries for specialized engineers to handle network routing, hard drive failures, and security upgrades.
For most businesses, the managed premium is worth paying to avoid the operational headache.
A standard cloud bill is difficult to read. A Kubernetes cloud bill is almost impossible to decipher without the right tools.
When multiple teams share the same Kubernetes cluster (multitenancy), the cloud provider sends a single, huge bill. The provider does not know which team deployed which application.
Finance teams see the total number rising, but they cannot trace the cost back to a specific department. When you cannot link infrastructure spend to a specific team or product feature, accountability disappears. No single team is responsible for the rising bill, as the cost is shared.
Running the Kubernetes system itself costs money. Managed services like Amazon EKS, Azure AKS, and Google GKE charge an hourly fee just to run the cluster control plane. For example, AWS charges $0.10 per hour for each EKS cluster.
If your engineering team creates dozens of small clusters for testing, those hourly fees add up rapidly.
Additionally, Kubernetes runs baseline background applications on every single server (node) in your cluster. These are called DaemonSets. They handle networking, security scanning, and logging.
These background tasks consume CPU and memory. You pay for that consumption before your actual business applications even start running.
Think of your cloud servers as empty cardboard boxes. Think of your applications (pods) as oddly shaped items you need to pack inside those boxes.
Over time, as applications start and stop, you end up with awkward, unusable gaps of space on your servers. This is called node fragmentation.
A new application might need 4 CPUs. You might have 10 CPUs available in total, but they are scattered across five different servers. Because the application cannot be split across multiple servers, Kubernetes orders a brand-new, expensive server to run it.
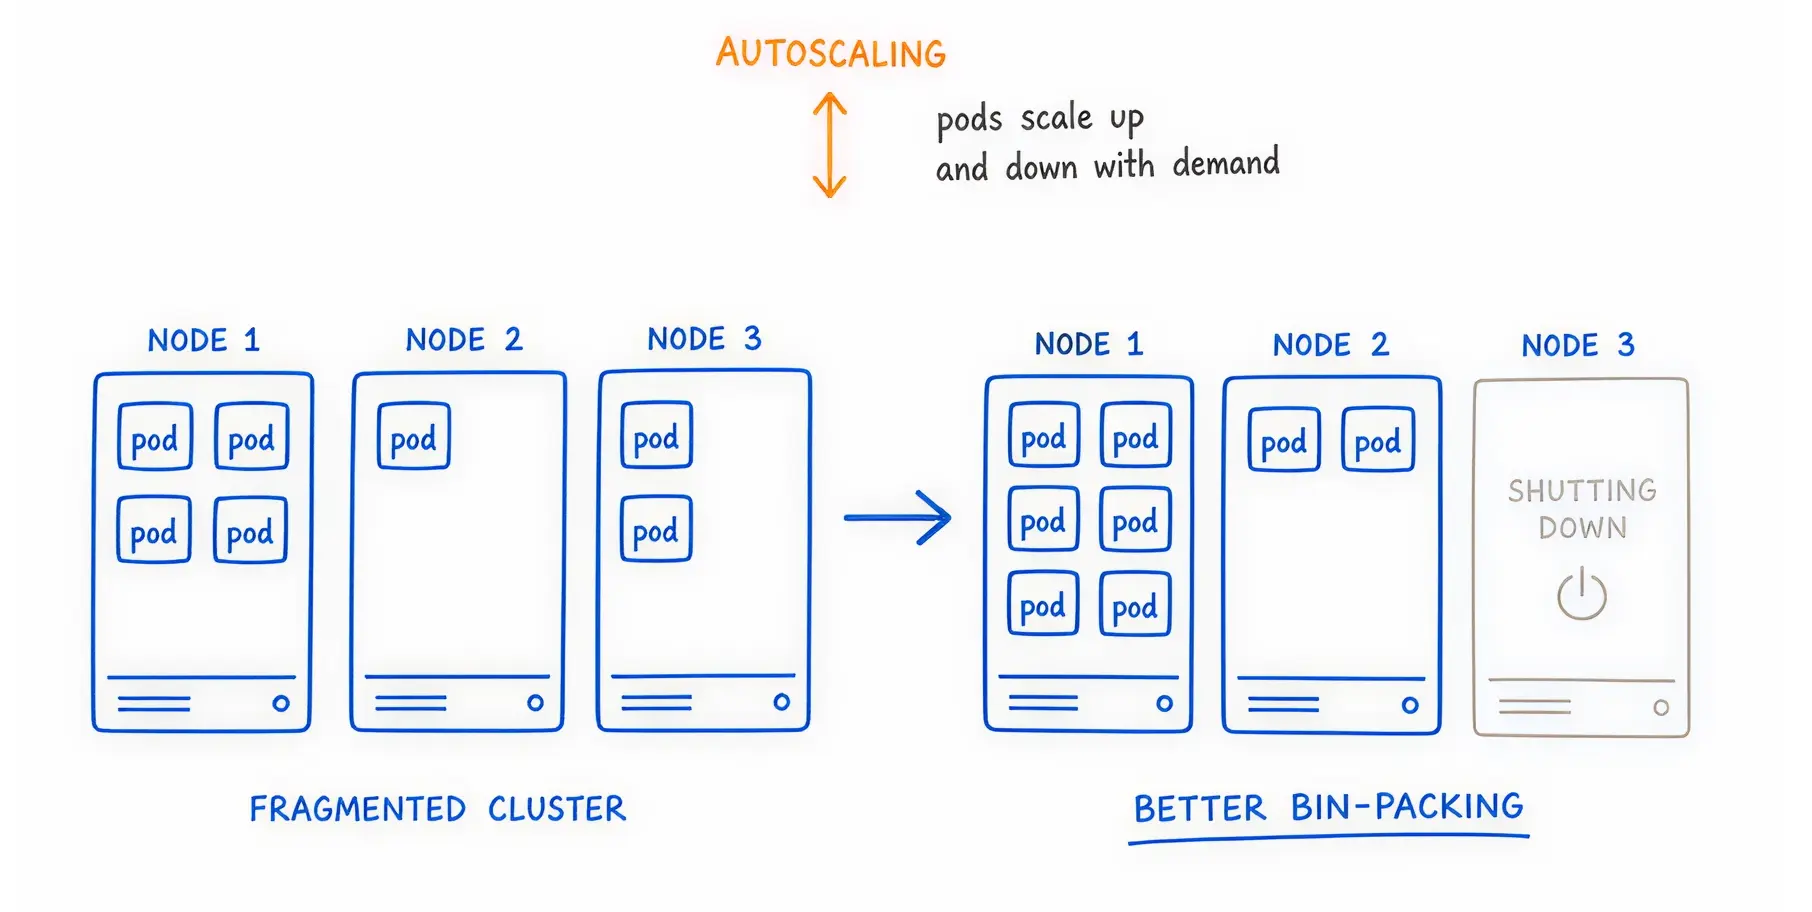
You pay for the new server while the old servers sit half-empty.
Cloud providers charge you when data moves between different physical data centers (Availability Zones).
In Kubernetes, your applications constantly talk to each other. This is called East-West traffic. If Application A is in Zone 1 and Application B is in Zone 2, you pay a data transfer fee every time they communicate.
If your applications chat heavily, these hidden networking fees can become the most expensive line item on your invoice.
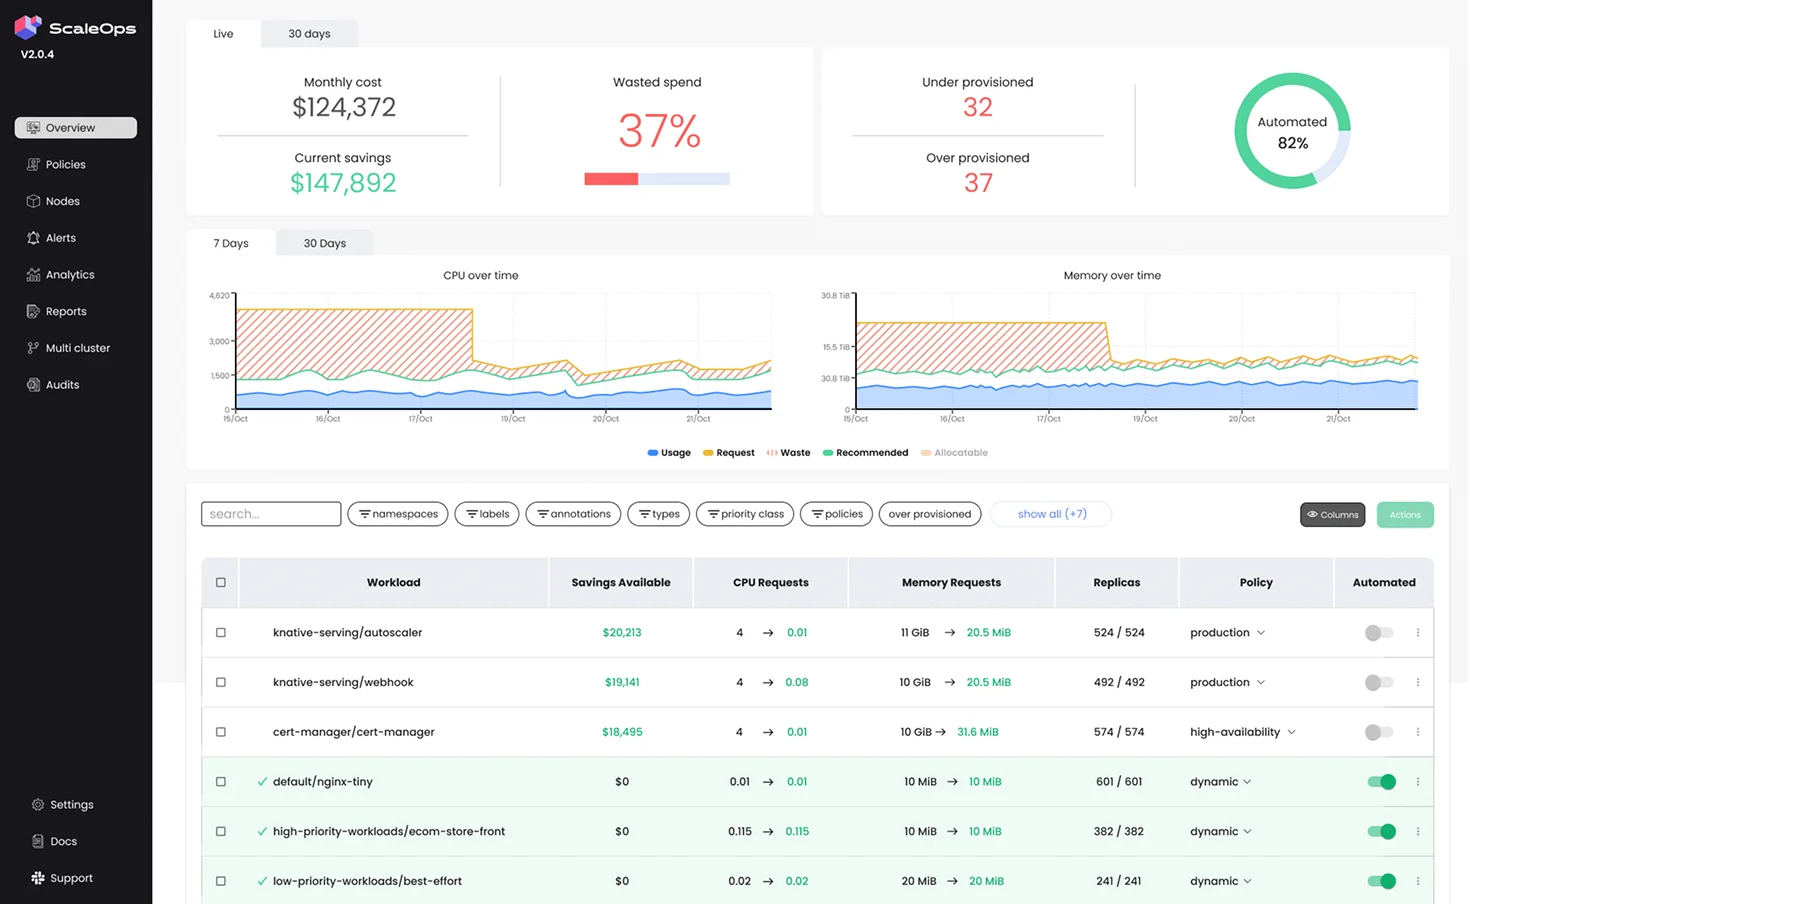
If your monthly spend is above $10,000, you need specialized software. Native cloud dashboards will no longer protect your profit margins.
The market is split into two types of tools. Visibility tools show you charts of where the money went. Automation tools actually log into your system and reduce the bill for you.
While other platforms specialize in either reporting or infrastructure, Costimizer bridges the gap with Agentic Execution.
Costimizer does not just send you an alert telling you that you are wasting money. It acts as an autonomous FinOps engineer. It tracks your exact spending patterns, identifies idle resources, recommends the precise right-sizing limits, and, with your permission, safely executes the changes directly in your environment.

These are the standard visibility tools. They are excellent at mapping Kubernetes Cost Allocation and network costs back to specific teams.. They provide excellent reporting for the finance department. However, they only advise you. Your engineers still have to do the manual labor of fixing the problems.
ScaleOps focuses heavily on the technical side of autoscaling. It is an excellent tool for managing the complex relationship between HPA and VPA, automatically adjusting resource limits in real-time as traffic fluctuates.

Cast AI specializes in the infrastructure layer. It replaces standard cluster autoscalers, rapidly provisioning Spot instances and tightly bin-packing pods to ensure no server space is wasted.
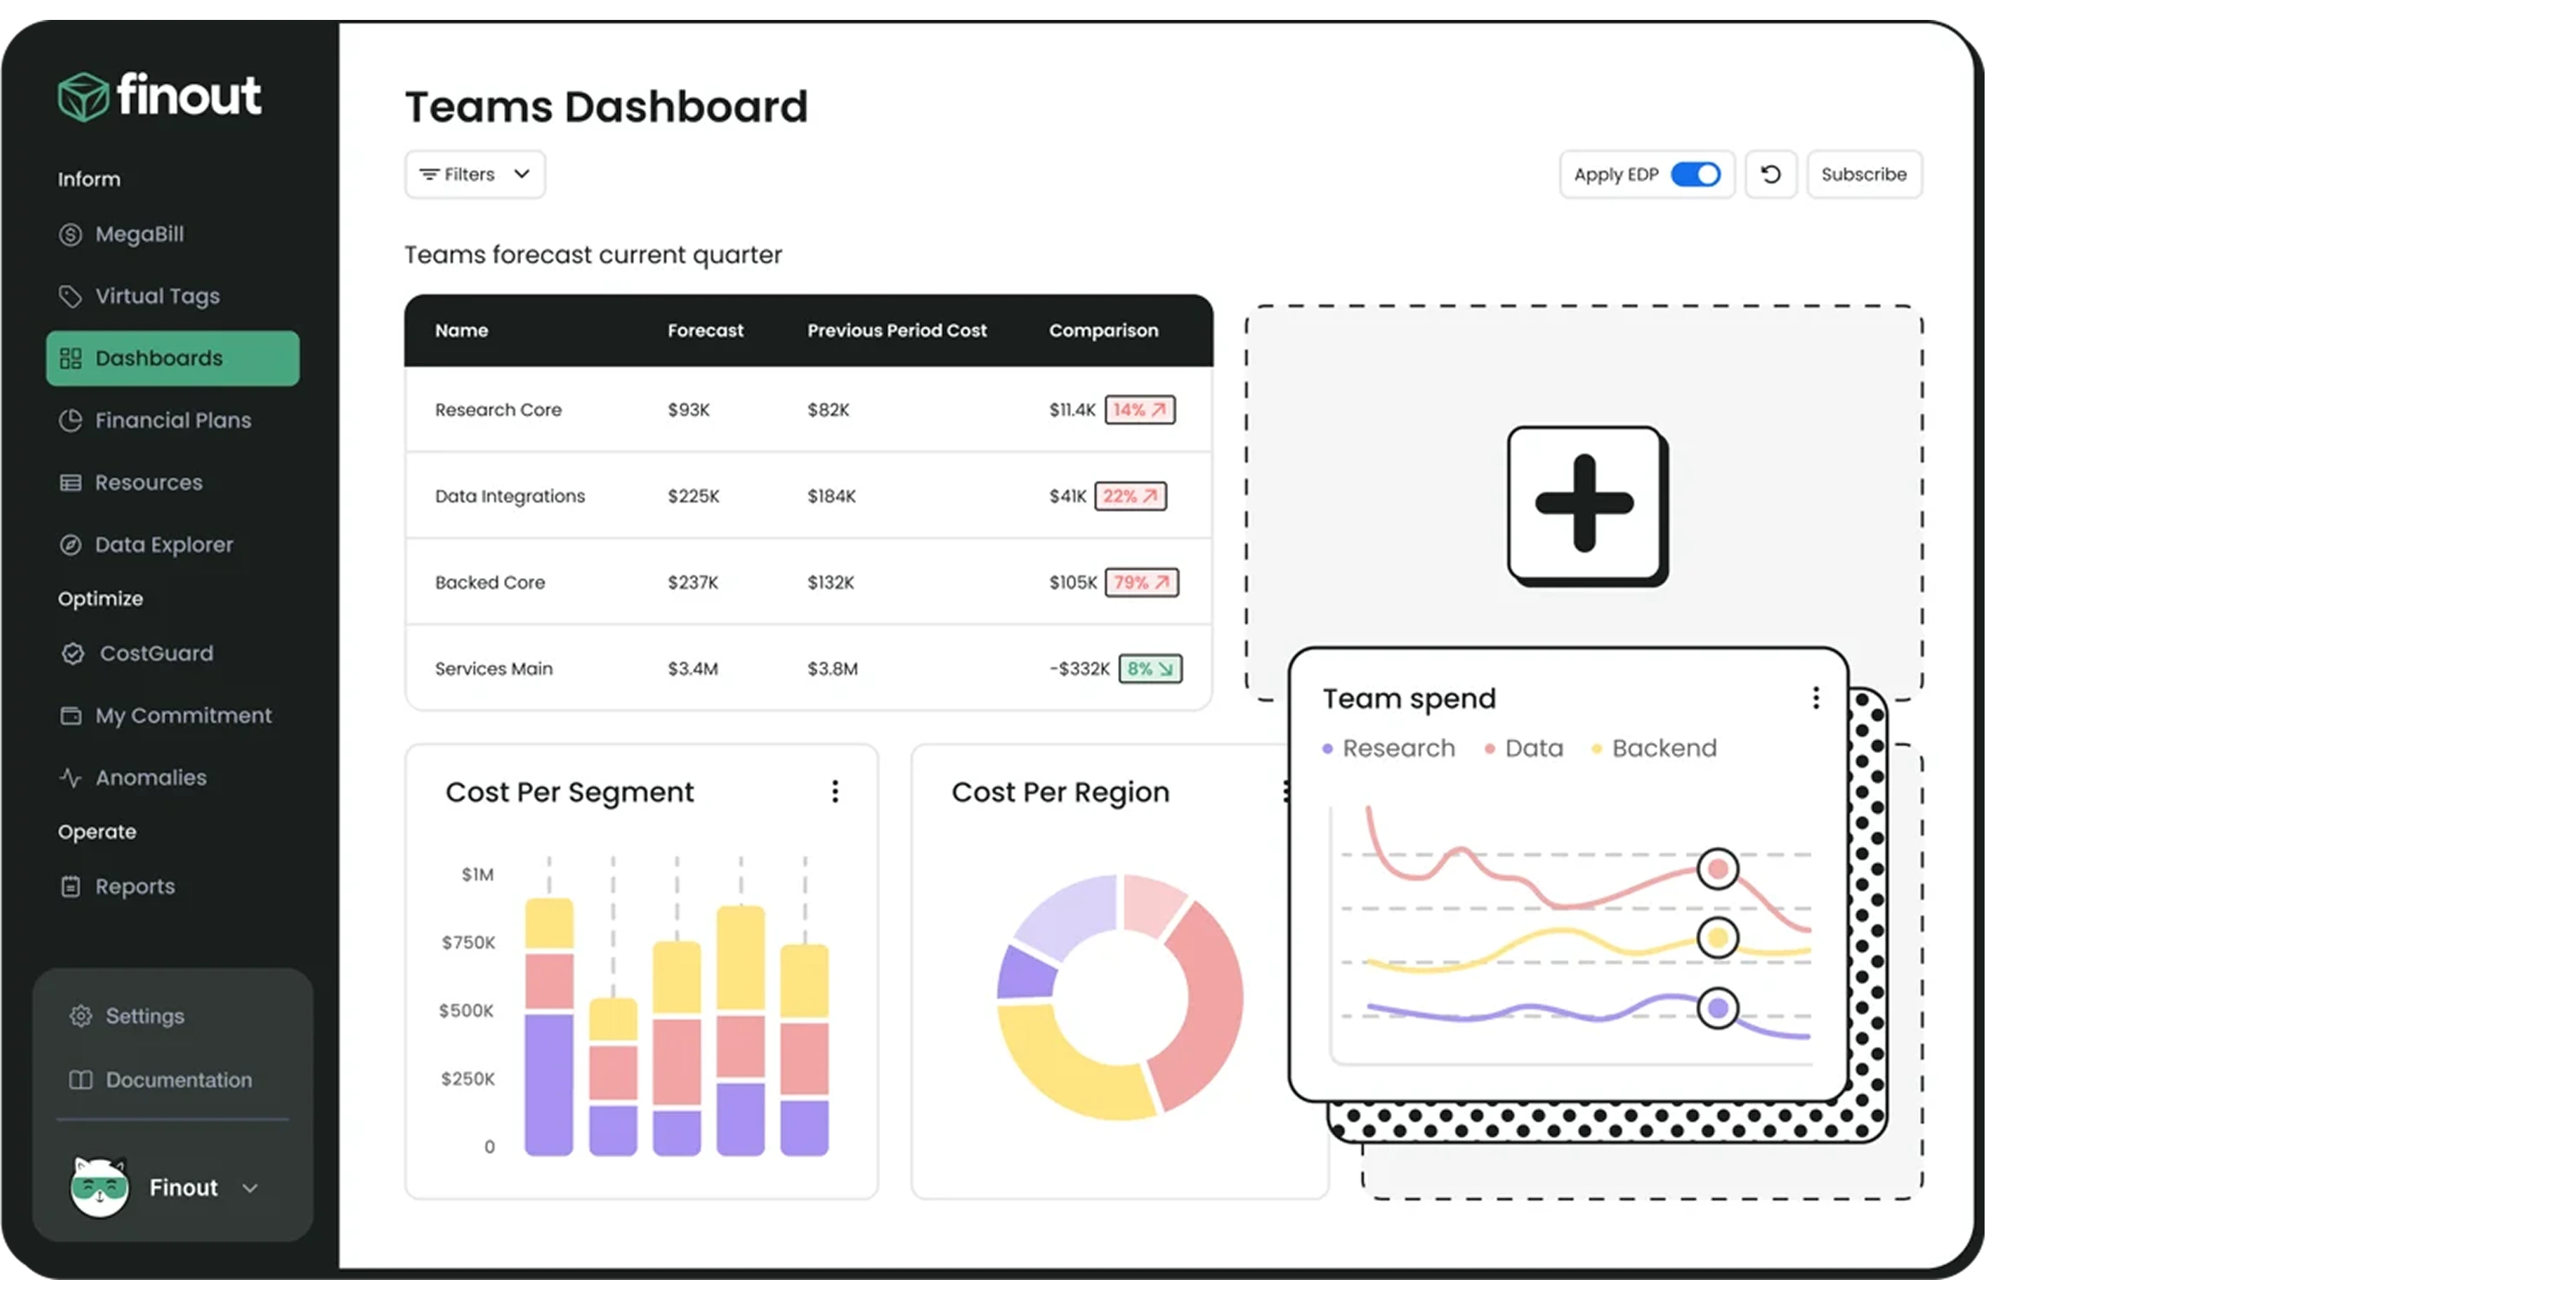
These platforms focus on the highest level of FinOps. They combine your Kubernetes bill with your external bills (such as Datadog, Snowflake, and OpenAI API costs) to give the Chief Financial Officer a single dashboard showing the company's total unit economics.
If you are an enterprise leader managing an engineering team. And if your team prioritizes speed, resulting in padded servers, forgotten deployments, and a cloud bill that hurts your bottom line.
You need a system that understands both the technical architecture and the balance sheet.
Here is the plan: Establish clear tags, implement right-sizing baselines, separate your autoscaling logic, and automate the shutdown of unused development environments.
But most importantly, stop relying on manual effort. Let AI do the heavy lifting.
If you ignore this, cloud waste will consume the budget you need for new hires and product innovation.
By applying these optimization strategies, your infrastructure becomes a lean, highly tuned engine. You pay only for exactly what you use, allowing you to scale your business profitably.
Take control of your infrastructure today. Connect your cloud to Costimizer in 60 seconds and let our Agentic AI uncover your 40% guaranteed savings immediately.
Most organizations see a 10 to 15 percent reduction in their cloud bill within the first 30 days simply by deleting orphaned storage volumes and applying basic right-sizing recommendations. Advanced savings from Spot instances take longer to architect but yield higher returns.
You have absolute control over permissions. You can start in a "recommend-only" mode where you manually approve every change. Once you trust the system, you can grant it specific permissions to handle low-risk tasks automatically.
Not if you use Pod Disruption Budgets and separate your autoscaling metrics correctly. Optimization is about removing idle waste, not restricting the maximum capacity your application can reach during a legitimate traffic spike.
Yes. Costimizer provides a single, unified dashboard that normalizes billing data across AWS, Azure, and GCP. You can apply the exact same financial guardrails and tagging policies across all your cloud providers simultaneously.
For small to mid-sized businesses, hiring a full-time FinOps engineer is often too expensive. Automated cloud cost optimization software can handle the daily tagging, reporting, and right-sizing tasks without adding a permanent salary to your payroll.
Costimizer uses performance-backed right-sizing. We analyze your historical traffic spikes to establish safe baseline requests, while leaving your maximum limits high enough to absorb sudden user activity without causing latency.
Cloud providers bill you for the physical servers (nodes) you rent, regardless of how much you use them. Your internal dashboard shows the usage of the applications (pods) running on those servers. The gap between the two numbers is your cloud waste.
Yes. Costimizer features a Cloud Power Schedule that allows you to set automated Time-to-Live policies. It will safely power down your non-production clusters on Friday night and turn them back on Monday morning.
•
CFO•
Articles