Most of the time, Azure costs go out of control because you don’t know what’s costing you.
If you want to break your bill down by team, project, or environment, that’s where tagging comes in. It’s a simple way to label everything so you can actually see where the money is going and who’s responsible for it.
In this blog, we are sharing exactly how to structure your tags, enforce them automatically, and stop paying for cloud resources you do not need.
Key Takeaways:
To make your system work, you need a structured plan. Microsoft’s Cloud Adoption Framework (CAF) recommends organizing your tags into five main categories. This prevents your engineers from creating random, messy labels.
Here is the exact structure you should use to track every dollar:
Tag Category | Business Purpose | Standard Tag Names | Example Values |
Accounting | Financial cost allocation and internal billing | Cost Center, Department, Project | 55332, Finance, Project Alpha |
Functional | Operational management and system grouping | App, Tier, Environment, Region | WebStore, Database, Prod, EastUS |
Ownership | Accountability and direct incident routing | Owner, Team, CreatedBy | jane@company.com, CloudOps |
Purpose | Aligning technical resources to business goals | Business Process, Business Impact | OrderProcessing, High |
Classification | Security, governance, and compliance tracking | Confidentiality, SLA, Compliance | Private, 24hours, PCIDSS |
Your finance team needs to track every dollar spent. Accounting tags make this possible. They support cost allocation, chargeback, and showback. Charge back means you actually bill internal departments for their cloud usage. Showback means you simply show them reports of what they spent.
When you use accounting tags, you can see exactly that the Marketing department spends $10,000 and the Engineering team spends $40,000. You should always include entities like Cost Center, Department, and Project. This exact data allows you to measure the return on investment for specific business initiatives.
IT teams need to find specific servers as quickly as possible. Functional tags describe the technical job of the resource. They define operational management and deployment characteristics.
For example, when a problem occurs, engineers can filter the Azure portal to show only the database tier for the production environment in the East region. Entities to include here are App, Tier, Environment, and Region. Sometimes, developers tie this directly to their code management. They might use a feature tag release branch strategy, with Azure environments recognizing costs back to a specific software update or version branch.
When a server crashes, your support team needs to know who to call. Ownership tags provide clear accountability and incident routing.
Without ownership tags, IT support wastes hours trying to find the person responsible for a broken application. You must include entities like Owner, Team, and CreatedBy. The "CreatedBy" tag is highly useful because it identifies the exact user account that originally deployed the resource.
CXOs need to know why a technical resource exists. Purpose tags align your IT resources directly to your business objectives.
If you need to reduce your cloud budget, you should not guess which servers to turn off. Purpose tags tell you exactly what process relies on that server. Entities to include are Business Process and Business Impact. If a server has a "High" business impact tag, you know it supports a critical company function.
Your security team needs to protect sensitive data. Classification tags handle security, governance, and compliance requirements.
These tags help auditors verify that certain data stays within approved locations. Entities to include are Confidentiality, SLA, and Compliance. For instance, tagging a database with "Confidentiality: Restricted" alerts your security tools to apply stricter firewall rules.
You cannot enforce 20 new tags on your engineering team today. They may resist, and deployments may fail. Deploy your tagging strategy in three distinct phases.
Start with the absolute minimum required for basic financial visibility. Focus entirely on strictly mandatory tags for FinOps.
You only need two tags in this phase: Cost Center and Environment. The Cost Center tag answers who pays for the resource. The Environment tag separates production resources from development resources.
This immediately stops you from paying production-level prices for simple testing servers. Keep it simple. Let your teams get used to adding these two fields to their deployment processes.
Once your teams reliably apply the foundation tags, you can introduce operational tracking. Roll out Application and Owner tags to enhance visibility and incident response.
This phase connects the technical infrastructure to the human beings managing it. If a specific application starts costing twice as much as last month, you use the Application tag to isolate the cost.
Then, you use the Owner tag to find the exact person who can explain the increase. This creates a culture of accountability.
In the final phase, you implement automation and strict governance. Introduce resource lifecycle management and compliance tracking.
You can add tags like Expiration Date or Auto Shutdown. When you tag a temporary testing server with an expiration date, automated scripts can read that tag and delete the server when the date arrives.
This permanently stops you from paying for forgotten resources. You can also add your classification tags here to comply with external auditors and internal security policies.
Also Read: Azure Blob Storage Pricing Guide
You cannot rely on people to manually type tags. People forget. People make spelling mistakes. You must force the system to apply and check tags automatically.
Azure Policy is a free tool inside your cloud environment. It acts as a strict checkpoint for your resources. You define a rule, and Azure Policy ensures every resource follows that rule.
You control tags using specific Azure Policy effects:
Many people believe that if they assign a tag to a Resource Group, all the servers in that group will inherit that tag. This is a very common misconception.
Resources do not inherit tags automatically from Resource Groups in Azure. If you tag a folder, the files inside do not get the tag. You must use Azure Policy to force inheritance. You can apply a policy named "Inherit a tag from the resource group if missing". This policy reads the tag on the parent group and automatically copies it to all child resources.
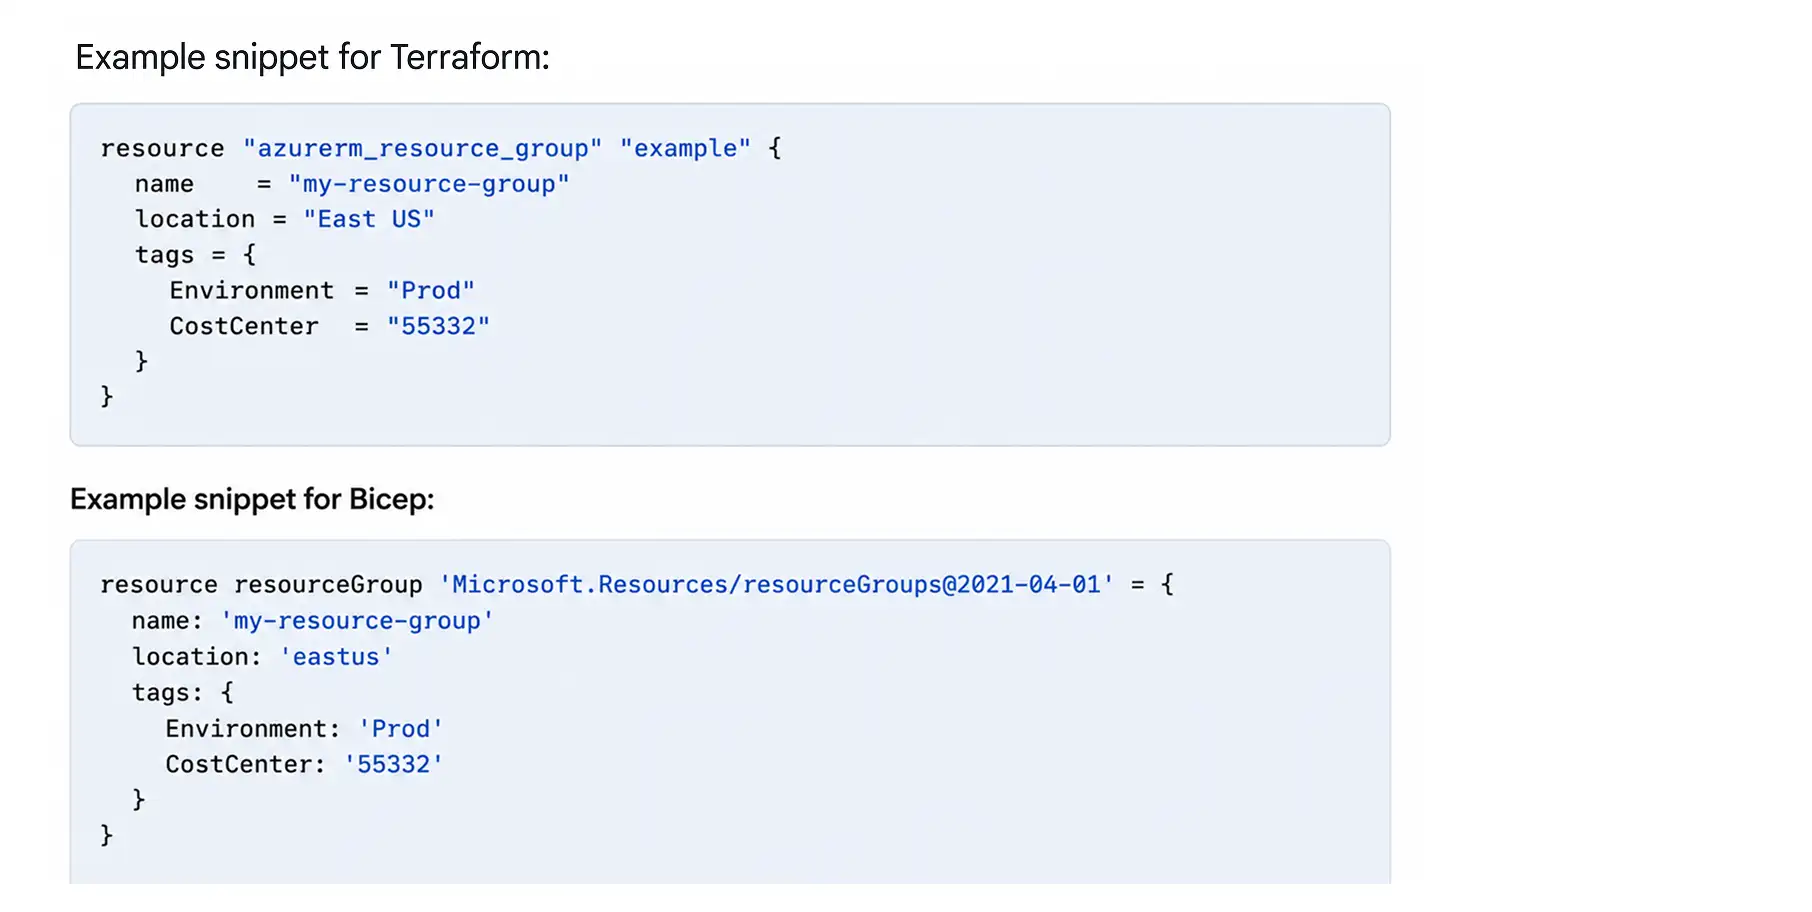
Modern engineering teams build cloud resources with code rather than clicking through web menus. This is called Infrastructure as Code. You must set your tags directly in the source code.
When you define tags in the code, every deployment is perfectly consistent.
Sometimes, resources for a single application are spread across multiple resource groups. This makes billing complicated.
Microsoft provides a specific tag called cm-resource-parent. This tag groups billing data in Microsoft Cost Management for resources that do not share a resource group.
You can set this tag's value to the exact ID of the main resource. The billing system reads this tag and bundles all costs into your invoice. You get one clean, total cost for the entire application.
Official documentation tells you the rules. Real-world IT professionals figure out how to use those rules to solve daily frustrations. Here are practical tagging strategies actively used by FinOps Experts.
Engineers frequently create sandbox environments to test new ideas. In most of the cases we have seen, they forget to delete them. You continue paying for these idle resources for months.
Our experts solve this by forcing users to input a duration tag for sandbox resources. The tag might be Duration: 5 days. A simple automated script runs every night, checks the creation date against the duration tag, and automatically deletes the resource when the time expires. This stops big waste.
When a critical system goes offline, IT support needs to act fast. Searching through company directories to find the right application owner takes too much time.
You can include a contact number or service desk queue tag directly on the resource. IT knows exactly who to call or which support group to alert during an outage. They see the phone number or queue name right there in the Azure portal properties.
Tracking a cloud resource back to the exact code file that created it can be very difficult.
We would recommend using open-source tools like yor.io to fix this. This tool automatically tags Terraform pipelines with metadata about the specific code repository and the exact user who deployed the resource.
If you see an expensive server running, you check the tag, find the exact code file, and know exactly who authorized the deployment.
Tagging seems simple, but there are many hidden traps. If you ignore these limitations, your billing reports will fail, and your deployments will break.
This is the most common and frustrating trap in Azure tagging.
Tag names (the keys) are case-insensitive for basic operations. However, tag values are completely case-sensitive.
If one engineer types "prod" and another types "Prod", Azure treats these as two entirely different values. Your billing software will create separate, frustrating line items. You will have to calculate the real totals manually. You must establish a strict naming convention. Most enterprises choose Pascal Case (e.g., Cost Center) to prevent these matching errors.
You cannot put unlimited text into a tag. Azure enforces strict limits on tag length.
You have a maximum of 512 characters for tag names and 256 characters for tag values. You also face a hard limit on the total number of tags. You can only apply a maximum of 50 tags per resource or resource group.
You must also know that specific resources do not even support 50 tags. Resources like Azure CDN, Azure Automation, and Azure DNS only support 15 tags. Keep your tagging strategy focused on the most important data.
You will eventually try to deploy a resource, and the deployment will fail because tagging is not applicable to that specific resource type. This breaks automated deployment chains.
Not every resource in Azure supports tags. You need to address the frustration of broken deployment chains. You must define a clear policy for handling shared or classic resources. Your Azure Policy rules should include exceptions for resource types that cannot accept tags.
This allows your automated deployments to continue running smoothly.
Tags are not secure vaults. Tags are simple text.
They are visible in billing exports, diagnostic logs, and the main Azure portal. You must never use tags for passwords, personal identifiable information (PII), or financial account numbers.
Anyone with basic read access to your cloud billing can see every tag value.
If you operate across multiple clouds, you must understand that tagging rules vary by provider.
You now understand the exact framework required to organize your Azure spending.
You know how to set up the five foundational tag categories.
You know how to enforce rules using Azure Policy, so your engineers cannot skip the process.
You also know the exact traps to avoid, like case-sensitivity errors and character limits.
However, building and maintaining this governance manually takes hundreds of hours. You want a profitable business, not a full-time job.
The problem is that manual tracking always falls behind, which is why businesses implement azure cost anomaly detection to catch surprise billing spikes before they escalate..
Costimizer acts as your automated guide. It takes the heavy lifting out of cloud cost control. Costimizer reads your existing tags, identifies missing tags, and actively auto-parks idle resources that drain your money. Our Agentic AI platform enforces your budgets and automatically cleans up the waste.
Stop funding unused servers. Connect your Azure account to Costimizer today to see your complete asset inventory and instantly reveal your hidden savings.
Tags only organize your bill; they do not turn off expensive, idle servers. You still need advanced azure cost optimization tools to read those tags and automatically delete the waste. For that, you need a costimizer.
Yes. You set the rules, and Costimizer executes them. Our Agentic AI can automatically turn off untagged or expired test environments outside of business hours to stop budget leaks.
You do not have to delete them. You can use Azure Policy's "Modify" rule to automatically add missing tags to older servers without causing downtime.
Azure treats them as separate items, which ruins your financial reports. You must enforce a strict naming rule, such as using exact department codes, to prevent duplicate billing lines.
Setup takes less than 15 minutes. Once connected, Costimizer scans your asset inventory and typically uncovers up to 30% in hidden cloud savings within the first 48 hours.
Yes. By tagging servers with specific software labels, your IT team can quickly count the exact number of active licenses you are paying for and cancel the extras.
Costimizer uses AI to automatically scan your billing data, spot mismatched tags, and clean up the naming errors so your financial reports are perfectly accurate.
No. Costimizer acts as your automated FinOps engineer. It finds the waste, alerts you instantly, and safely auto-parks idle resources without requiring a massive tech team.
•
CFO•
Articles